


Featuring Logan Wood
Adobe® Lightroom has introduced new landscape masking options which can work on underwater images to isolate coral reefs, fine tune split shots (half-in, half-out of the water), and tweak your background water color. Logan Wood shows you how to leverage the new tools to streamline your underwater image editing workflow.
Adobe just released a new AI landscape masking tool inside Lightroom that will allow you to mask and make local adjustments much quicker. So let's run it through a couple photos in the water and check out how this new feature works.
Reefscape Image
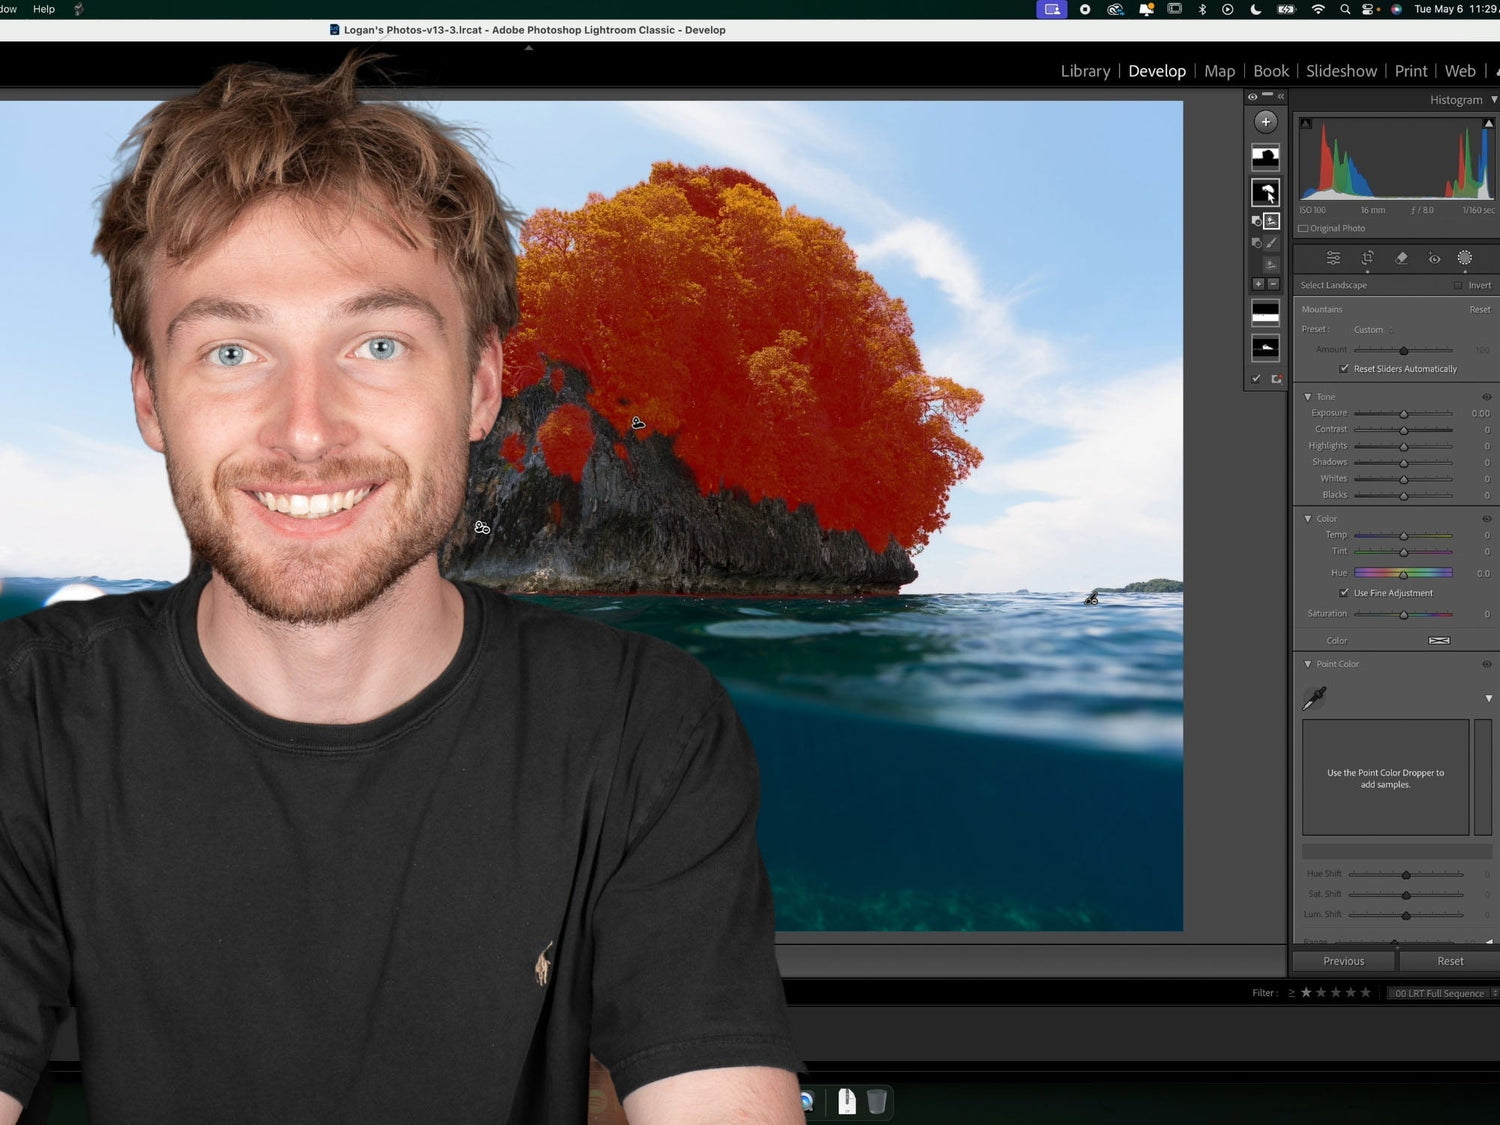
Alright, so here in Lightroom we have a couple photos from a recent trip to Raja Ampat. This first photo is an anemone and an anemone fish with some nice coral. I'm going click on the Develop tab and go straight over to the masking feature, which is the circle in the top bar, and click on that. If you're familiar with masking, you'll see all the regular options with the addition of a new Landscape option. So I'm going to click on the landscape option and it'll detect the subjects in the scene fairly quickly. You'll see that we have two options, water and vegetation.
Now in the few underwater shots that I've ran through this, coral usually comes up as vegetation and in this instance, the anemone does as well. So we're going to select vegetation as well as water and make sure that the “Create 2 Separate Masks” option is selected as well. Then hit Create Mask.

Make sure you select the "Create 2 separate masks" option so that you can edit each of these independently.
This created two separate masks, one for the water and one for the vegetation (or the coral and the anemone). From here, I'm going to click on the water mask and then I'm going to make any adjustments, specifically the water or whatever is selected in red. If you don't see your red overlay, you can either check or uncheck the button under the mask layers to see it.
But you'll also see that if I recheck this overlay, that it's detected some of the parts of the photo that isn't water. To fix that we can just click on our mask and head down to the minus button (-) and select the minus brush then brush over all the parts that we don't want selected.

Use the brush tool in the "Subtract from Mask with..." dropdown menu to remove unwanted elements from your mask.
Now if we hover over that brush, we can see all of the mask that we've subtracted from the original water mask. And if we do before and after, you can see that we've only made adjustments to the water.
Then we'll go into the second mask. Again I'm going to uncheck the button under the mask layers so I can see what I'm working with. In this instance, maybe I just want to make the anemone pop a bit, so increase the exposure and do a little bit of clarity.
Again, you can see in the mask that it's selected a little bit of the coral in the back, and maybe I don't want that. So we're going to do the same thing, minus brush, and brush that away.

If you find you're having trouble brushing away some of the overlay or some of the mask, you can make sure that “Auto Mask” is unselected.
Now let's say that it didn't select something that you did want selected. You can do the same thing, but with the plus icon (+) and select a brush or any of these other options. I like to use the brush for small additions, and you can take that brush and you can brush anything in, and everything you've brushed in will be included in your mask.
So now with both masks and local adjustments done, our photo has just changed a little bit, we didn't make too many adjustments, but it's a good demo of what this can do for an underwater image.
Then outside of the masks, we can make global adjustments to the entirety of the photo as we wish with contrast, exposure, highlights, shadows, etc.
Split Shot Image
Let's move on to the next photo, which is a split shot. We're going to start by just cropping this a little bit then go straight into the masking and hit landscape.
Once it's detected the subjects in the scene, you'll see we have the sky, mountains, water, and natural ground. Again, we're going to select all of these and make sure that it's creating four separate masks for each subject. Select Create Mask, and you'll see all the masks in the sidebar.
Let's start with the mountain. Before I go into making local adjustments for the exposure, I can see right off the bat that some of these masks have selected parts of the image that I really don't want. The mountain mask has a little bit of the water, this boat, and I don’t want to make changes to those when I make changes to the mountain. Just like before, I'm going to go use the minus brush to remove the elements that I don't want.
Now it's really cool that it was able to detect the mountain as a whole object. However, it did not detect the trees or the vegetation on the mountain. But say I wanted to make local adjustments to just those trees. What I'm going to do is go into the mountain mask, hit minus, then go to the select landscape option. It's going to bring us back to the original masking options, and I'm going to minus the natural ground from the mountain and select Create Mask. Now it's created a whole separate mask that's the mountain minus the natural ground, and it's just selected the trees. So now I have four separate masks for the sky, the trees on the mountain, the water, and just the natural ground of the mountain.
We'll start with making the trees on this mountain pop a bit. So I'm going to up the shadows, maybe up the exposure just a little bit. Then maybe go into the natural ground, also bump the shadows up a bit. Then I can increase the exposure of the water. There's not much going on in the water, so I might dehaze it a little bit. Then maybe go into the sky, bring down the exposure a little bit. There are a lot of options for all of these masks but for now I'm just going to leave it like this.

Split shot: the final product. With this new Lightroom feature you can make fast and precise edits to your underwater photos. © Logan Wood
You can see that you can make local adjustments to all these masks much more quickly than you were before when you had to select each subject manually.
I hope this new feature is useful for you in your underwater photography or your topside photography. And if you have any questions, reach out to us at ikelite@ikelite.com.
Additional Viewing
AI Techniques We're Using in Underwater Photography RIGHT NOW [VIDEO]
How to Remove Backscatter with One Click // BackscatterXTerminator BSXT Tutorial [VIDEO]
Split Shot Editing // Balancing Exposure Underwater and Above in the Lightroom [VIDEO]
Top 5 New Features in Adobe Lightroom with Kristina Sherk
Underwater Photo Editing: Trash to Treasure Using Lightroom [VIDEO]
Manual White Balance for Underwater Still Photography
Making a High Resolution Still from a Video Clip Using Topaz Photo AI [VIDEO]
Logan Wood is a published photographer, cinematographer, and Producer at Ikelite. Stemming from a great appreciation for the outdoors and living an active lifestyle, his work focuses on capturing and sharing the natural world through the latest technologies. When not in the studio, Logan can be found cruising on his bike, going to concerts, and researching where to go next. You can see more of his work at loganwood.net and on Instagram @jlowood