Featuring Logan Wood
Shooting video is great underwater when you want to capture every moment of action. But when you go to pull that perfect frame to create a still from video, the results can be lackluster. Ikelite Video Producer Logan Wood shows you how to use Adobe Photoshop and Topaz Photo AI to expand, enhance, sharpen, and denoise the frame to create a stunning image suitable to hang on your wall.
Follow along with Logan in the video or scroll down to read the full transcript.
Introduction
When I'm diving, I usually lean more towards shooting video, but there are so many moments that I wish I could capture in a still photo. So I'm going to break down one method that I use for creating high resolution stills out of one frame of a video.
To do this, I'm going to be using Adobe Photoshop and Topaz Photo AI. I'm sure you know what Photoshop is, but if you haven't heard of Topaz, you should really check it out, and today I'm going to show you why.
For this example, I'm going to be using a video of a juvenile fish that I shot while Blackwater diving in Yap.
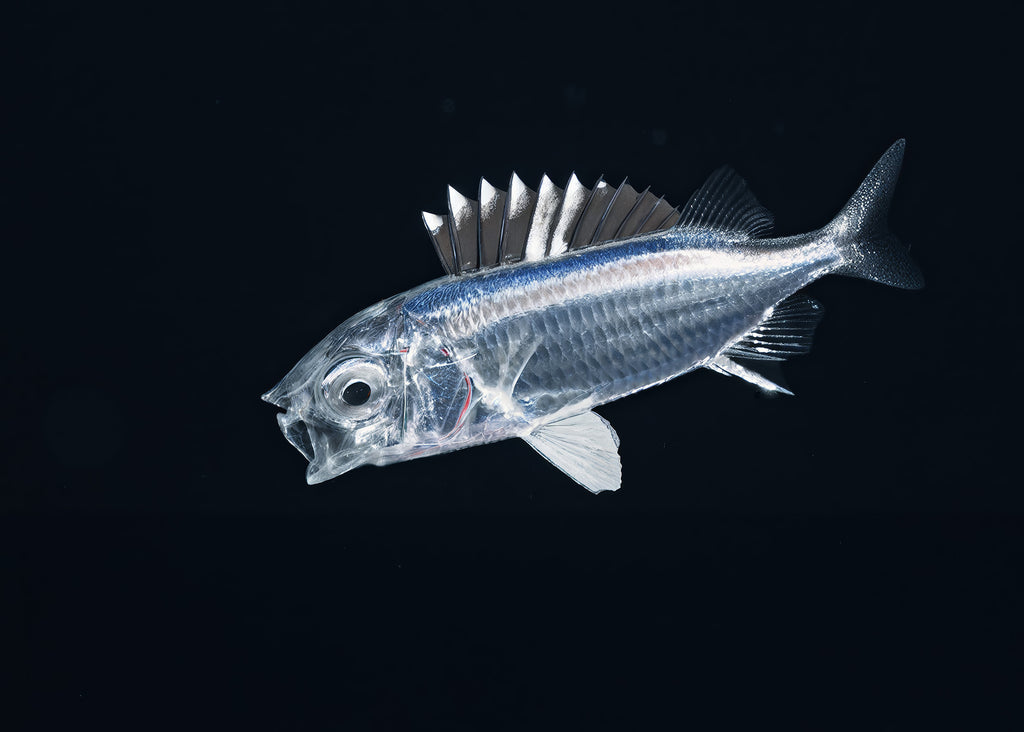
Final result. I really like this moment when it sees its reflection in the dome and kind of flares up and gets defensive. © Logan Wood
This process works best with footage that's shot in 4K and at higher shutter speeds so there's less motion blur in the original frame. This was shot in 4K 120, so I had a shutter speed of 1/250, and it's already pretty sharp.
Exporting the Video Frame
I'm going to start off by having my clip on the timeline in whatever software that you're using. Here I'm in DaVinci Resolve, and I'm just going to place my playhead at the moment that I want to capture.
Now, I'm not going to go into detail about how to export a frame in all the editing softwares, but it's usually somewhere under the file menu. In DaVinci Resolve, it's just File > Export > Current Frame as Still.
Then find a folder somewhere to export it, and I'm just going to rename it to “fish” I'm going to be exporting it as a TIFF file just because we're going to be exporting it a few different times, and I don't want it to lose quality. So TIFF then Export. From there, find the image, and we're going to open it up into Photoshop.

Use the Generative AI feature on Photoshop to reframe your subject.
Generative AI Expand
Now it's important that you have the latest version of Photoshop so that you can take advantage of Photoshop's generative AI features.
For this example, I'm going to head over to the Crop Tool, and I'm just going to draw a box around my entire image. Unfortunately, when I shot this, the moment that I want to freeze, the fish is kind of down at the bottom of the frame. There's a lot of negative space at the top, and I'd rather be in the middle. So using Generative AI, we can just expand the canvas until the fish is in the middle.
Depending on your image, you might not have to do this or you might need to make it bigger or smaller, whatever you need to do. But once I've got the box looking good, I'm just going to hit Generative Expand and I'm not going to type anything in, and just hit Generate.
Once you do that, it'll give you three different variations, and you can cycle through them and see which one is the best. From there, I'm going to select both of the layers, and flatten the image to combine the original frame and the new expanded layer.
Then back into the Crop Tool, and I'm going to crop it to a normal photo aspect ratio, something like 4:3 and I'm just going to place it right there in the middle.
Because we expanded the canvas, we have a lot more flexibility in what our final composition is going to be.
At this point, I'm just going to go in and remove a little bit of the imperfections. Using the Spot Healing Brush, I'm just going to clean up some of this backscatter. But thankfully, there's not a ton here.
Topaz Photo AI
Now we're going to bring this photo into Topaz Photo AI. To do that, just go to File > Automate > Topaz Photo AI. Once you download and install Topaz, this shortcut will be automatically installed into Photoshop.
Honestly, I've been a bit hesitant to use Topaz in the past because I think that some of the effects can make the image look kind of fake. But in the latest Photo AI 3, when applied subtly, I think some of the improvements can really help out a lot. The one I'm going to show today is a great example of that.
When your photo is first loaded in, you'll usually have two default Denoise and Sharpened layers automatically applied. I'm just going to delete both of those for now and head into their new Super Focus option.

Topaz Super Focus
Head into their new Super Focus option I'm going to use the Medium Sharpen Strength as well as the Large Preview Control Box.
If you click on the subject or the main focus point of the image (here it'd be the fish's head) and let it load, it'll give you a preview of what the final Sharpening result will look like. Just give it a few minutes.
Now the render preview is finished and we've got a much more detailed shot of the fish. If you hit the backslash "\" button you can see the before and after. It just kind of smoothed everything out and sharpened things and just looks a lot more high resolution.
If your image looks really fake or not sharp enough, you can always go into the Sharpen Strength and either choose the low or the high. You can also play around with the Focus Boost if the original shot is out of focus.
But here, I think this is looking good. So I'm just going to hit render. This can take a while, so I recommend just going off and doing something else for however long it takes. It'll usually tell you, but sometimes it takes 10 - 15 minutes.
Super Focus is done rendering and we're left with a much more detailed photo of this fish. First time I ran it through, I was blown away by how much it was able to recover while still looking relatively natural. I don't think there's any effects here that look too plasticky and fake. I'm really happy with this result.
Topaz Sharpen & Denoise
Now I'm going to add in those two Denoise and Sharpen layers back into the image just to pull out a tiny bit more detail.
We're going to Sharpen and by default it'll pick the model that it thinks is best, I'll just keep everything else on default. It just pulled out a little bit more, but still looks pretty natural.
Then I'm going to add a Denoise. One thing I do like to use in Denoise is the Original Detail Slider. I think that bumping it all the way up to like 75 is a really subtle but good way of retaining some of the detail that was there originally.

Before (left) and After (right) of using the Original Detail Slider.
The last thing I'm going to do is upscale the image. If you start with a 4K image, it's around 9 megapixels, I think. So I just like to upscale it, just x2 is fine.
That's looking good, double check everything, wait for it to load, then Export to Adobe Photoshop, and it will bring it back into Photoshop.
Photoshop Finishing Touches
From here, we'll have our layer with all of our Topaz adjustments.
You're basically done, but sometimes I'll go into the Filter > Camera Raw Filter, and you can make any more adjustments that you need to the color. But here I like to just add a little bit of Texture (Effects > Texture) that way I can blend some of the effects if they didn't come out as natural as I wanted them to. Just a little bit of Texture and possibly just a tiny bit of Grain. Again, to make it more natural.
Anything that I missed, any imperfections, can also be cleaned up at this stage. So I'll just go in and remove a little bit of the artifacts from backscatter.
At this point, we're done and we can just go to File > Export > Export As... I'll choose JPEG and bump up the Quality and hit Export.
Now we're left with a pretty high resolution image all from a video frame grab. Again, I think this is super impressive that we're able to pull this much detail out of a video frame.
We've taken a frame from a video and turned it into a high resolution image using Topaz AI and Photoshop. I will say this does not work on every single frame. You're just going to have to experiment with your video and see if it looks good.
Additional Viewing
First Results // Topaz Photo AI Enhancement of Underwater Images
Setting the Right Frame Rate and Shutter Speed for Your Underwater Footage [VIDEO]
Underwater Photo Editing: Trash to Treasure Using Lightroom [VIDEO]
What is it Really Like on a Blackwater Dive? Hanging over the Yap Trench, Micronesia [VIDEO]
How to Use the Exciting New Adobe® Photoshop Tools with Kristina Sherk
AI Techniques We're Using in Underwater Photography RIGHT NOW [VIDEO]
Logan Wood is a published photographer, cinematographer, and Producer at Ikelite. Stemming from a great appreciation for the outdoors and living an active lifestyle, his work focuses on capturing and sharing the natural world through the latest technologies. When not in the studio, Logan can be found cruising on his bike, going to concerts, and researching where to go next. You can see more of his work at loganwood.net and on Instagram @jlowood



![Making a High Resolution Still from a Video Clip Using Topaz Photo AI [VIDEO]](http://www.ikelite.com/cdn/shop/articles/Recovering_Video_Frame_using_Topaz_AI_Sharpening_copy.jpg?v=1732630036&width=1500)
