


![Sony a7R V Underwater Tips & Set Up [VIDEO]](http://www.ikelite.com/cdn/shop/articles/My_project-1_-_2023-03-02T142112.jpg?v=1677784936&width=1500)
By Logan Wood
Recently I got the opportunity to take the new Sony a7R V diving for a whole week as the Ikelite crew cruised south through the Exuma Islands. This video will cover my setup for shooting underwater - my choice in dome port, trim weight system, and some extremely helpful customizations.
If you take nothing else out of this video, the Custom Button Shortcuts will save you so much time and they’re relevant for other Sony Alpha cameras too. Watch the video below or scroll down to learn how to customize your camera for these settings:
- Separate Photo and Video Settings
- Turn on “REC w/ Shutter”
- Set “AEL” button to “Tracking on Toggle”
- Turn on back button focus, set “AF-On” to “AF-ON”
- Set “C1” to “Gamma Display Assist Set.”
- Alternatively, “C1” can be “Focus Area” or “Switch Focus Area”
- Set “C3” to “White Balance”
- Set the front dial to control your shutter speed
- Set the rear dial to control your aperture
Sony a7R V Housing
We make one housing that works with both the a7R V and a7 IV cameras. Physically, both the cameras are pretty similar but the small differences require separate base mounts, just make sure you’re using the right one for your camera. There is also a small difference in the mode dial between the two cameras. The a7R V has a button on the mode dial that needs to be pressed to turn the dial. So you’ll have to put a small screw inside of the housing control. It’s really easy to install, and you can just keep it installed even if you’re using the a7 IV. Both the base plate and screw come standard with the housing after January 1st 2023, and the upgrade kit is available on our website if you already own the housing.

The 200DL Underwater Housing # 71479 accommodates both the Sony a7R V and a7 IV.
Choosing a dome port
For your lenses you’ll need to add a compatible DL system lens port to the front. Your choice of port will depend on what lenses you’re shooting, so check out our lens port chart to find the right combination.
Some wide angle and zoom lenses are supported by your choice of two different domes: the Compact Dome, and the full 8-inch Dome. I shot both of these, each for different reasons, and each have their pros and cons. The compact dome is great for speed and general ease of shooting. It’s less buoyant, so it’s easy to get underwater. It has a small enough profile that it’s easy to travel with and doesn’t cause any noticeable drag while diving. The compact dome is actually a smaller section of a full 8-inch dome so you’ll get similar edge sharpness.

The Trim Weight System will help keep your video footage smooth and seamless underwater and can also help prevent wrist fatigue.
The full size 8-inch dome is a bit bigger, but is almost essential for getting some great over-under shots. Because there’s more volume in the larger dome, it makes the system more buoyant which can make it tough to keep it level while diving. But the solution for this comes in the form of our Trim Weight System. What’s cool about the trim weight system is that it just uses a standard dive weight that you’d find at a dive site, so you don’t need to travel with any weights. This aluminum rail attaches to the bottom of the housing and can be adjusted forward or backward depending on your dome length. I had the Sigma 24-70 on my camera, which is a pretty big lens, and found that a 2lb (16oz) weight evened everything out nicely.

The Compact 8" Dome Port is excellent for travel and keeping your system low profile, but you'll love the full 8" Dome Port for split-shots. © Logan Wood
Custom button shortcuts
One phrase you’ll hear us say all the time is “know your camera,” and not just know how to change your settings. Know your camera so that it works for you. If you don’t like where a dial is, know how to change that setting to a different button or dial. There were a handful of quick changes I made to make shooting underwater a lot easier and faster. 
The first change was to separate photo and video settings, this way I could switch between photo and video without having to change my all my settings each time. To do this go to the last menu that looks like a tool box, scroll to the third page, and choose “Different Set for Still/Mv” and check all the boxes. Personally, doing this is the difference between taking photos and video, instead of just one. Changing the settings each time is a waste of time.
Next, scroll down to “Record w/ Shutter” this will make it so your shutter button starts and stops recording. This way I didn’t have to reach on top of the housing to the red button and can use the shutter trigger that is already by my finger. It’s a simple change but it’ll save you time.
For the next custom button, press the menu button, go to the last menu, scroll to the third page, but this time choose “Custom Key/Dial Set” for either photo or video. In my case these settings will be for video.

I set my “AEL” button to “Tracking on Toggle.” Go to the AF/MF menu, Focus Area page, and choose “Tracking on Toggle.” This allowed me to toggle the new AI tracking autofocus without the touchscreen, which I don’t have access to underwater. I just press it to start tracking and press it again to end tracking. There’s also an option called “Tracking On” but if you choose this you’ll have to keep the button pressed to track. Either option works, I just found it easier to keep a stable shot if both my hands were on the handle instead of pressing the button.
Another change I made was turning on back button focus. I think this is set by default, but if it's not for you then you can find this option in the AF/MF menu, first page, and choose “AF On.”
Next, I chose to make my Custom Button 1 (C1) toggle the Gamma Display Assist. This is found in the last menu, fifth page, and choose “Gamma Disp. Assist Select.” I was shooting a lot of LOG on this trip and that really helped me gauge my exposure by bringing back some contrast to my live view. If you’re not shooting LOG, another good shortcut that could go here is changing your focus area. That’s in the AF/MF menu, second page, and choose either “Focus Area” which will bring up the sidebar menu or “Switch Focus Area” which will toggle through the different options each time you press the button.
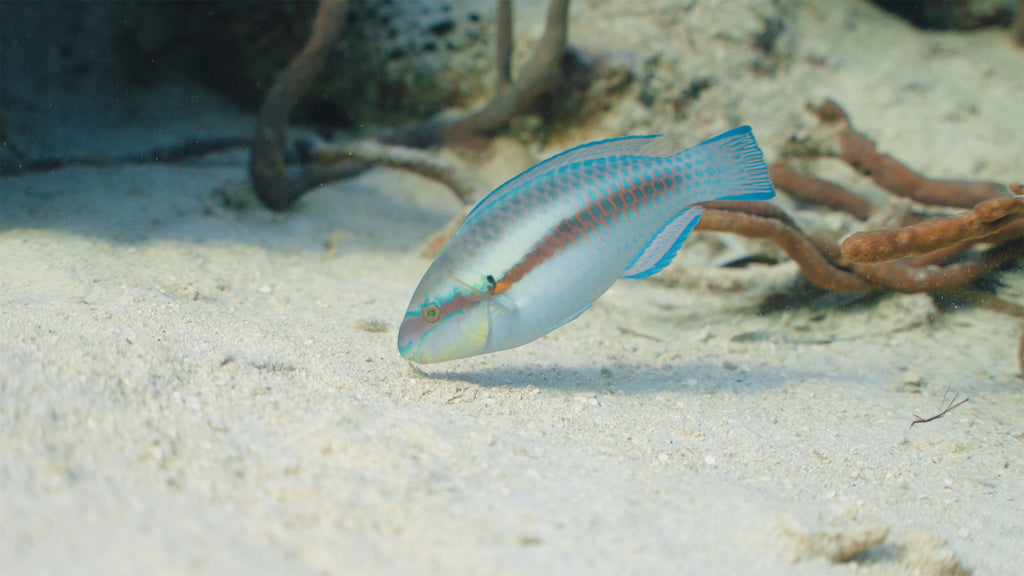
Keep your colors correct with the custom white balance setting. © Logan Wood
Probably the most important change is creating a shortcut to custom white balance. If you haven’t already, check out our video on the importance of setting a custom white balance. Go to the Exposure menu, fourth page, and choose “White Balance.” On my camera I made it Custom Button 3 (C3), so I could easily reach it with my left thumb. This made it that much faster to sample the sand, my hand, or my buddy’s tank to get the right white balance.
Finally, I switched the rear and front dials. Out of the box the rear dial controls your shutter and the front controls your aperture. While shooting video, my shutter is staying pretty consistent and only changing when I change frame rates, and usually I’m using the aperture to adjust my exposure. So I found it a lot easier, and more stable, to use the rear dial as my aperture and front dial as my shutter. To do this go down to the dial icon on the Custom Key Menu. The first option will be to change the front dial, to set it as shutter speed go to the Exposure menu, first page, and select shutter speed. Then the second option will be your rear dial, go to the same exposure menu, page one, and select Aperture.
In conclusion
That’s my set up for shooting the Sony a7r V underwater. Of course there are hundreds of ways to set up your camera, so if you don’t like mine, switch some things around to make it work best for your shooting style. I hope this makes your next dive a little easier. If you want to see more of my footage and hear my thoughts on the camera itself, stay tuned to our YouTube channel for the next video. For now, check out the Sony a7R V Underwater in the Exumas Bahamas results video.
As always if you’re having trouble figuring out what you need or just have a few more question reach out to us via email at ikelite@ikelite.com
Logan Wood is a published photographer, cinematographer, and Producer at Ikelite. Stemming from a great appreciation for the outdoors and living an active lifestyle, his work focuses on capturing and sharing the natural world through the latest technologies. When not in the studio, Logan can be found cruising on his bike, going to concerts, and researching where to go next. You can see more of his work at loganwood.net and on Instagram @jlowood
Additional Reading
Custom White Balance for Underwater with Canon Mirrorless Cameras [VIDEO]
Take the Sony a7R V Underwater RIGHT NOW! [VIDEO]
Setting the Tone: Color Grading for Underwater Photography
Sony 16-35mm F4 Zoom Gear Installation // Ikelite 200DL Underwater Housing [VIDEO]
DO'S and DON'Ts of 200DL and 50DL Underwater Housing Set-up [VIDEO]
![TTL Underwater Strobes for Canon R10 (and R7) // Setting it Up [VIDEO]](http://www.ikelite.com/cdn/shop/articles/canon-r10-strobe-cover.jpg?v=1772218138&width=2001)
![Using a Trim Weight System for Balance and Stability Underwater [VIDEO]](http://www.ikelite.com/cdn/shop/articles/ikelite-trim-weight-system-underwater.jpg?v=1678996396&width=2000)