


![Nikon 24-120mm Zoom Gear Installation // 200DL Underwater Housings [VIDEO]](http://www.ikelite.com/cdn/shop/articles/Nikon_24-120mm_Zoom_Gear_Cover_32004658-1b4a-486b-a1fe-978013d3c506.jpg?v=1760722175&width=1500)
The Nikon NIKKOR Z 24-120mm f/4 S lens is not our favorite for underwater photography but its long zoom range is tempting for traveling photographers and people looking for a "one-lens-fits-all" solution.
This will show you how to install the 24-120mm lens and zoom gear in your 200DL Ikelite Underwater Housing.
Note: Please make sure to check the correct Port Chart for your housing to confirm compatibility. We recommend adding the optional Trim Weight # 47140 to your housing when using this lens and port combination.
Installing the Gear Sleeve # 5509.46
For this demonstration I'll be adding Nikon's 24-120 millimeters Z-Mount lens to the Nikon Z6 II using the Gear Sleeve # 5509.46.
First, remove the retaining ring then I'll push the button to release the body cap. Then I'm going to take the dedicated interference friction fit gear sleeve for this lens, put it down in the port opening. Take the retaining ring, drop it around that, take the tool, snug this down. It does not need to be over tightened.
Installing a +4 Diopter to the Lens
At this point you need to add a +4 diopter to the front of the lens. You won't be able to shoot photos underwater without it. The +4 diopter simple threads onto the front of your lens before you move on to the next step. Note that adding a +4 diopter prevents a lens from focusing at infinity above the surface of the water. If you want to use the system at or above the surface of the water then I recommend choosing a lens that can focus to 12inches or less throughout its entire zoom range.
Learn more: Why Your Lens May Need a +4 Diopter Underwater
Installing the 24-120mm Lens
Make note of the white dot on the camera body and the white dot on the lens itself. Roughly align those two things as you insert the lens through the gear sleeve. You'll feel the interference fit and then can go ahead and just bayonet the lens onto the camera body. Once you have it onto the body, check your zoom.
Dome Port & Extensions
We're going to need two extensions: the 42mm Port Extension and the 20mm Port Extension, plus the large 8 inch Dome Port.
Make sure that all three thumbscrews are loosened so they're not protruding to the inside diameter of each of the components. Take some of the included Ikelite lubricant on your fingertips and run that around the extension o-ring, inspecting for any flaws in the o-ring or debris.
It doesn't matter which extension you put on top of the other. In this case, I'm going to put the 42mm on the bottom. I'll do the same thing to this o-ring, and then I'm going to check the sealing surface of this extension.
You'll notice pockets that correspond with each thumb screw, align the thumb screw with the pockets, press firmly down, and that's sealed now. Now we're going to tighten these three thumbscrews, finger tight to keep it retained.
Next, take your attention to the dome. Check the sealing surface just like you did the extension.
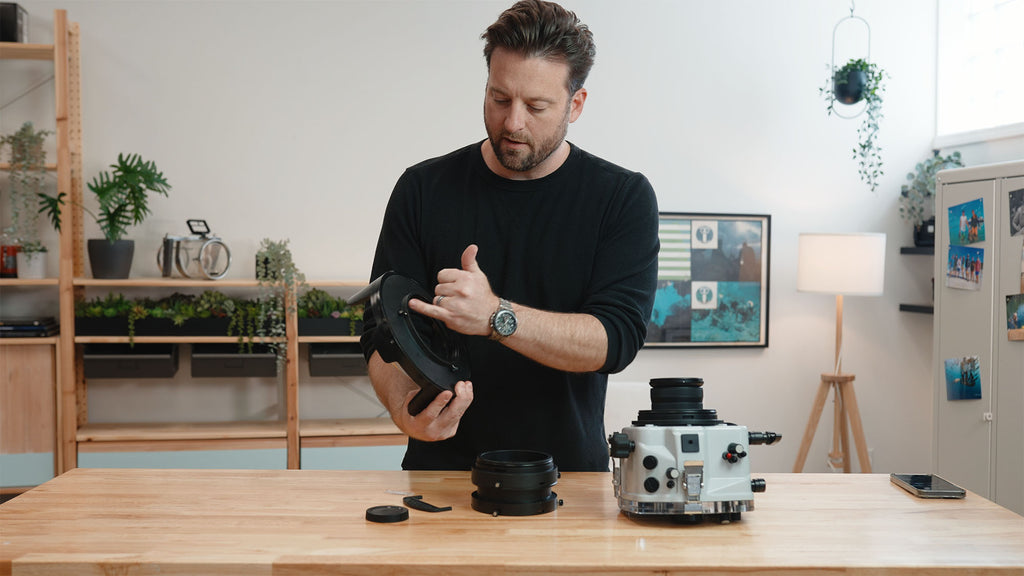
You'll notice on the dome that one of the three thumbscrews is going to align with the shade. We want that to be at the top of our housing.
In this case, etched on the extension is the name of the extension. I will take that corresponding thumb screw and put that at the top again, lining the thumb screws with the pockets, finger tightening each of the three thumbscrews in the dome port.
Attaching the Port
Using a little bit of Ikelite lubrication, do the same thing to the o-ring on the port mount that you'd just done to the extensions. Just a little bit of lubricant goes a long way as you're just trying to overcome the friction of the two parts going together and the lubricant does not create the seal.
With the shade at the top, we're going to go ahead and correspond those three thumbscrews there with the pocket in the top of the port mount. Press those pieces together and tighten each of the three thumbscrews. And that's it. That's all that's required for the Nikon 24-120mm installation.
If you have any questions, send us an email via ikelite@ikelite.com
 John Brigham is the Vice President & head of product development at Ikelite. He was born with a flair for design and an entrepreneurial spirit as son of Ikelite founder Ike Brigham. He worked his way up in the business and is a natural fit in the R&D side of things. John dives the equipment as much as possible to test product and put himself in the "fins" of the user. You may also find him on the other end of an email or phone call when you reach out for product advice and support. When he's not underwater he's flying drones, setting off rockets, training his German Shepherd "T2", and spending time with his family.
Additional Reading
Top 3 Best Lenses for Nikon Full Frame Mirrorless Underwater [VIDEO]
Why Your Lens May Need a +4 Diopter Underwater
Nikon Z6 II or Canon R6 Housing? Back in the Water in Catalina [VIDEO]
Nikon Z6 II, Z7 II 200DL Underwater Housing Compatibility Update
How to Polish an Acrylic Dome Port [VIDEO]
Replacing Push Button O-Rings on an Ikelite Underwater Housing [VIDEO]
![Adding a GoPro to Your Ikelite Underwater Housing [VIDEO]](http://www.ikelite.com/cdn/shop/articles/GoPro_Mounting_Options_Cover.jpg?v=1695238911&width=1440)
![Sony RX100 VII VI // Underwater Housing Assembly [VIDEO]](http://www.ikelite.com/cdn/shop/articles/Sony_RX100_Assembly_copy_58d849b2-1f3b-4935-81e9-d8f828ab0d51.jpg?v=1738781332&width=1440)