


By Jeff Milisen
Corals are the backbone of a tropical reef system. They serve as habitat for fishes, generate nutrients that feed the surrounding ocean, and prevent erosion of coastal communities. For photographers, they can be a stunning backdrop or a deserving centerpiece. Mixed with their importance for tropical reef ecosystems, a worthy close-focus wide-angle photo featuring coral should be the crown of a scuba trip’s portfolio. Soft corals are stunning and they don’t move much, and yet shooting them well requires a skillset that will force you to rethink how you approach scene composition. This guide is designed to help you translate soft corals colorful chaos into a coherent and captivating scene.

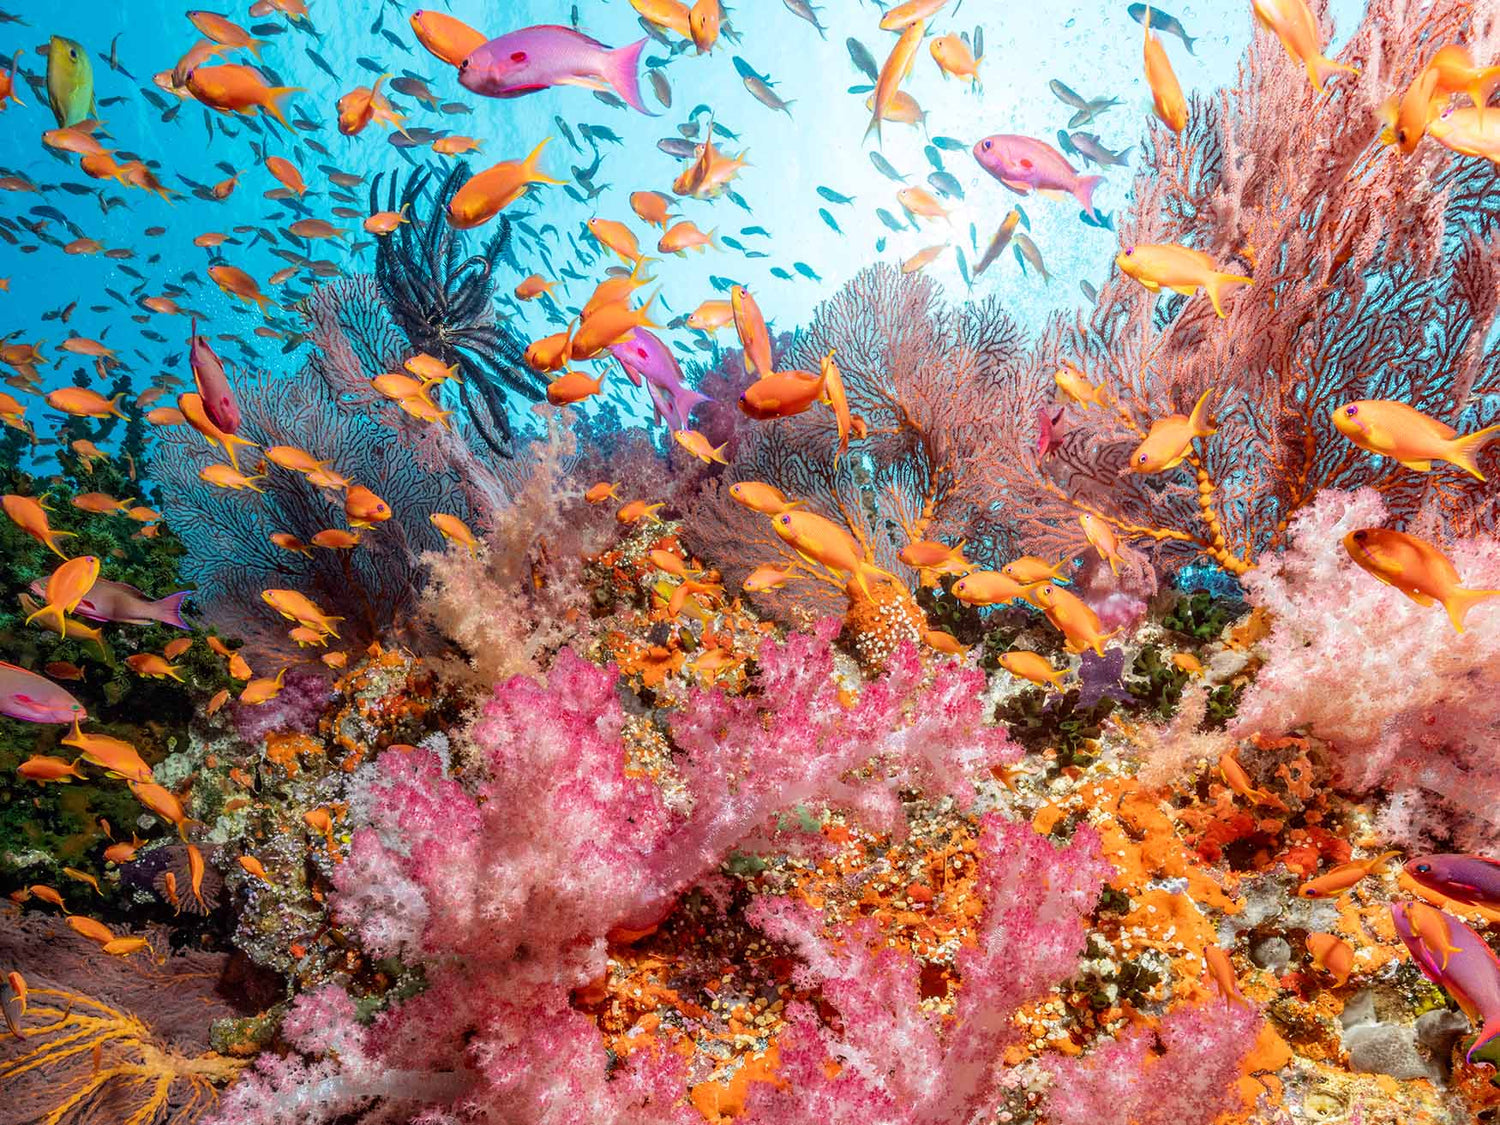
Fijian reefs are full of brilliant color. 1/200 • f/14 • ISO 640 © Jeff Milisen
Camera Settings
As with any good photo lesson, let’s make sure to get the technical settings right before moving on to the technique. I’m a big proponent of shooting in manual exposure. It can feel daunting for the first timer, but it is actually really simple. The three settings below (aperture, shutter speed, and ISO) form your exposure, but each has implications for your creative vision as well. Aperture affects depth of field (DOF). Shutter speed affects motion blur. Knowing that I want a medium DOF and no motion blur, I will often have the aperture and shutter speed set before even entering the water. That only leaves ISO to adjust for changing lighting conditions.

The unique reef structures of the Red Sea present unique opportunities. This pinnacle was draped in beautiful corals. In lieu of fish, I found a midwater subject in my dive buddy. 1/200 • f/8 • ISO 320 © Jeff Milisen
DSLR + Mirrorless
Lens: Go as wide as you can. For a cropped-sensor DSLR, Tokina’s 10-17mm super wide will be useful, but for full frame mirrorless setups, something in the vicinity of Canon’s 14-35mm works great!
Mode: M (Manual)
Aperture: f/8 to f/11 for cropped sensors, and f/14 to f/18 for full frame.
Shutter Speed: Max shutter speed for the strobes. This is usually 1/200-1/250.
ISO: 100-1200. Adjust your ISO for the lighting conditions. The right ISO may be vastly different depending on your depth, visibility, time of day, or even whether you are shooting horizontal or upwards toward the sun. Adjust for the size of the sunball and the color of the water.
Point + Shoot
Mode: M (Manual) or Av (Aperture Priority)
Aperture: F/8 (smallest available)
Shutter speed: 1/125 to 1/200
ISO: 100 to 400

Soft corals can be a cacophony of activity. Depicting the kaleidoscope without confusing the viewer means finding your subject, getting close to it, and letting the rest of the chaos do its thing. 1/200 • f/14 • ISO 160 © Jeff Milisen
Technique
Finding the right subject is the key to this process. Focus on brightly-colored corals on walls or at the edges of overhangs. On many reefs, there is one section that seems to get 80% of the action, so I try to spend as much of my time there as possible. Often this will be on the up-current side of a reef, which can be especially challenging. Always remember that these places are delicate ecosystems. You have to be careful not to touch or kick anything while maneuvering for your shot. Your photo is much less important than the reef. If one prominent coral isn’t working because you can’t get to your angle, there are certainly others in the area that will. For close-focus wide-angle shots, you should be thinking in terms of creating distinct foreground, midwater, and background elements.
Foreground: The foreground will be the prominent, brilliant-colored coral head you spent time picking out. You will want to get as close as possible, carefully filling the frame from one edge to the other with coral. The closer you get, the more dynamic the image you will create. As a bonus, because the red spectrum disappears so quickly, the closer you get to the subject, the more your reds will pop. You’re usually going to want to shoot upwards. This will put the coral head away from the reef and against a contrasting sea of blue, setting you up to place the midwater and background elements in the same frame.
Midwater: The midwater element can be tricky, but it is going to put your coral into context and give your image some depth. The silhouette of a reef rarely makes for a useful midwater subject. My favorite midwater element is a cloud of fish positioned just behind the coral head. As you approach, the fish may be scared into hiding, so wait a few moments for your exhaust bubbles to clear before you take your shot. Other times, your dive buddy can make a nice subject. Instead of asking for my buddy to pose for a shot, I prefer to let the scene happen organically. Ahead of time, let your buddy know that you are going for more candid shots and that you would like them to swim through the frame from time to time. Then you just have to find a coral ahead of the group and wait.
Background: The general idea is to angle your shot with special attention to where the sun ball is going to be placed. My favorite compositions put the sun backlighting my subject, but other compositions can work as well.

Every once in a while a scene just comes together. The way the canyon creates a path for your eyes to wander along while giving the sea fan and diver space and contrast. 1/200 • f/16 • ISO 2000 © Jeff Milisen
Strobes
You are creating a still image from a dynamic scene that looks vastly different with every subsequent click of the shutter. There is no correct strobe setting for a given scene, but you will know an incorrect one when you see it. Don’t be afraid to try something, look at the image, and adjust to the scene.
Strobe Angle: Back around the time I visited Raja Ampat, I would swim through a reef with a wide-angle lens and my strobes set to 9 and 3 o’clock. I quickly became tired with the process, and the images I made from that trip were boring. Then I went to Papua New Guinea and met a dive guide who had learned a thing or two about photography. I remember shooting a gorgonian hanging off the side of a sea mount and hearing a disapproving groan behind me. As I turned around, he grabbed my camera, looked at my boring image, and started moving my strobes around at impossible angles. After some fiddling, one strobe was pointed directly at my camera while the other was straight ahead. He was using the arms and angles to fill and create shadows selectively. The strobe arms looked tangled, but the image that came from it was divine. This completely changed how I thought about strobes.
Strobe Power: Your strobes are going to work with ambient light to create the shadows and colors that make your image a piece of art. Think of your strobes like a fill light, counteracting the power of the sun as you shoot upwards. Diffusers are a must. When viewing an image, your eyes are naturally drawn to the brightest parts, which is why blown-out highlights ruin an image: they are distracting. When shooting corals, we can use this to our advantage. I throw a lot of strobe power at the corals to compete with the sun, make sure the coral is the brightest part of the scene, and squeeze every last drop of red color from the reef that I can find.

Sea fans are closely related to soft corals and can be treated similarly. They can be shot on their edge or give an image a translucent texture when shot through. 1/200 • f/8 • ISO 200 © Jeff Milisen
Additional Viewing
Photographing Fiji Underwater with the Canon R5 II: An In-Depth Review
Bringing Out the Colors of Fiji: "Soft Coral Capital of the World"
Divers on the Reef Underwater Camera Settings and Technique
Tropical Reef Underwater Camera Settings
Underwater Photography in Raja Ampat with Grant Thomas
 Ambassador Jeff Milisen is an internationally acclaimed underwater photographer who has specialized in blackwater photography since 2009. He is a recent addition to the Ikelite ambassador team. His upcoming book, a Field Guide to Blackwater Diving in Hawaii (2nd Edition), will help both newbies and seasoned blackwater veterans identify the strange animals they encounter. Read more...