


By David Gutteridge
Using your sensor as a canvas and painting the subject with light to expose the photo.
If we recall the basics of a cameras function, we will observe that the sensor will essentially burn an image onto the medium. From the early points of the technology this meant copper sheets covered in silver, which was a slow burn process that took some eight hours or more to expose when first discovered and 20 seconds when the process was more refined around 20 years later.
Photography has since made enormous strides and we now have systems in place with abilities that even we might scarcely have thought possible, shooting at speeds so fast you can freeze any frame you want, if you just have the light to do it.
But what if you don’t? This is where light painting comes into play.
Almost falling back to the basics of photography, in light painting we keep the shutter open for long periods of time and manually fill in the light you need to expose the subject, and complete the frame.
Equipment
Tripod
Depending on the subject and angle you want, you may need to get higher in the water than normal arms and clamps allow. I personally use a cheap tripod that I don’t mind using in salt water - rinsing well and a little wd40 helps to keep them in OK shape, but I consider these sacrificial. I carry a couple of kilos of extra weight to stabilise the tripod and strip the rig of any float arms.
We are spoiled here in the fjords with very small tidal movement, which means I am rarely diving in strong currents. Your rig may need extra stabilisation if you are.
Light
Trial and error have led me to the lights I use today. Front-light is provided by a small video light at 1500 lumens. It helps that this light has a mechanical on off switch. Many lights have a push and hold switch to turn off but being able to turn off quickly is useful. I have added a shade to the light to reduce spread to the sides.
For backlighting I use my normal primary light. About 4000 lumens with a narrowly focused beam. The on/off is less important here as all lighting is done from behind the subject; You can simply point the light down or cover it with your hand in between lighting sets. I also use a third narrow beam light behind the camera pointing backwards, this functions as a guide to get you back to the camera in case you get a little disoriented.
Camera
I started light painting with a D7000 in an Ikelite housing and have since upgraded to a Z7. Any camera with either "time" (Nikon Z7, D7000 did not have this mode) or "bulb" mode will work. Nikon specifically mentioned as it is the system I know. Canon, Sony, Olympus, Lumix, Fujifilm, and any other manufacturer with the above-mentioned modes (or similar) and housing availability will work.
Lenses
My go to lens is the 8-15mm fisheye. Future projects may experiment with smaller subjects to see what is possible. 14-24 and 60mm macro may come into play here.
Settings
Long shutter times means ISO can be as low as your camera will go. Depending on your camera, you will want to use “time” mode (Z7), “bulb” mode (D7000) or any variant of these that your camera might offer. “Time” mode will open the shutter when you press the release and keep it there until it is pressed again, which gives you enormous freedom to play around with lighting.
This mode wasn’t available on the D7000 when I started so I made use of the “bulb” mode. This will keep the shutter open as long as the release is held, so a simple rubber band rigged to the release did the trick.
Aperture can be experimented with. For a small wreck I will usually start at F11, for a larger wreck or more distance I may go as high as F8.

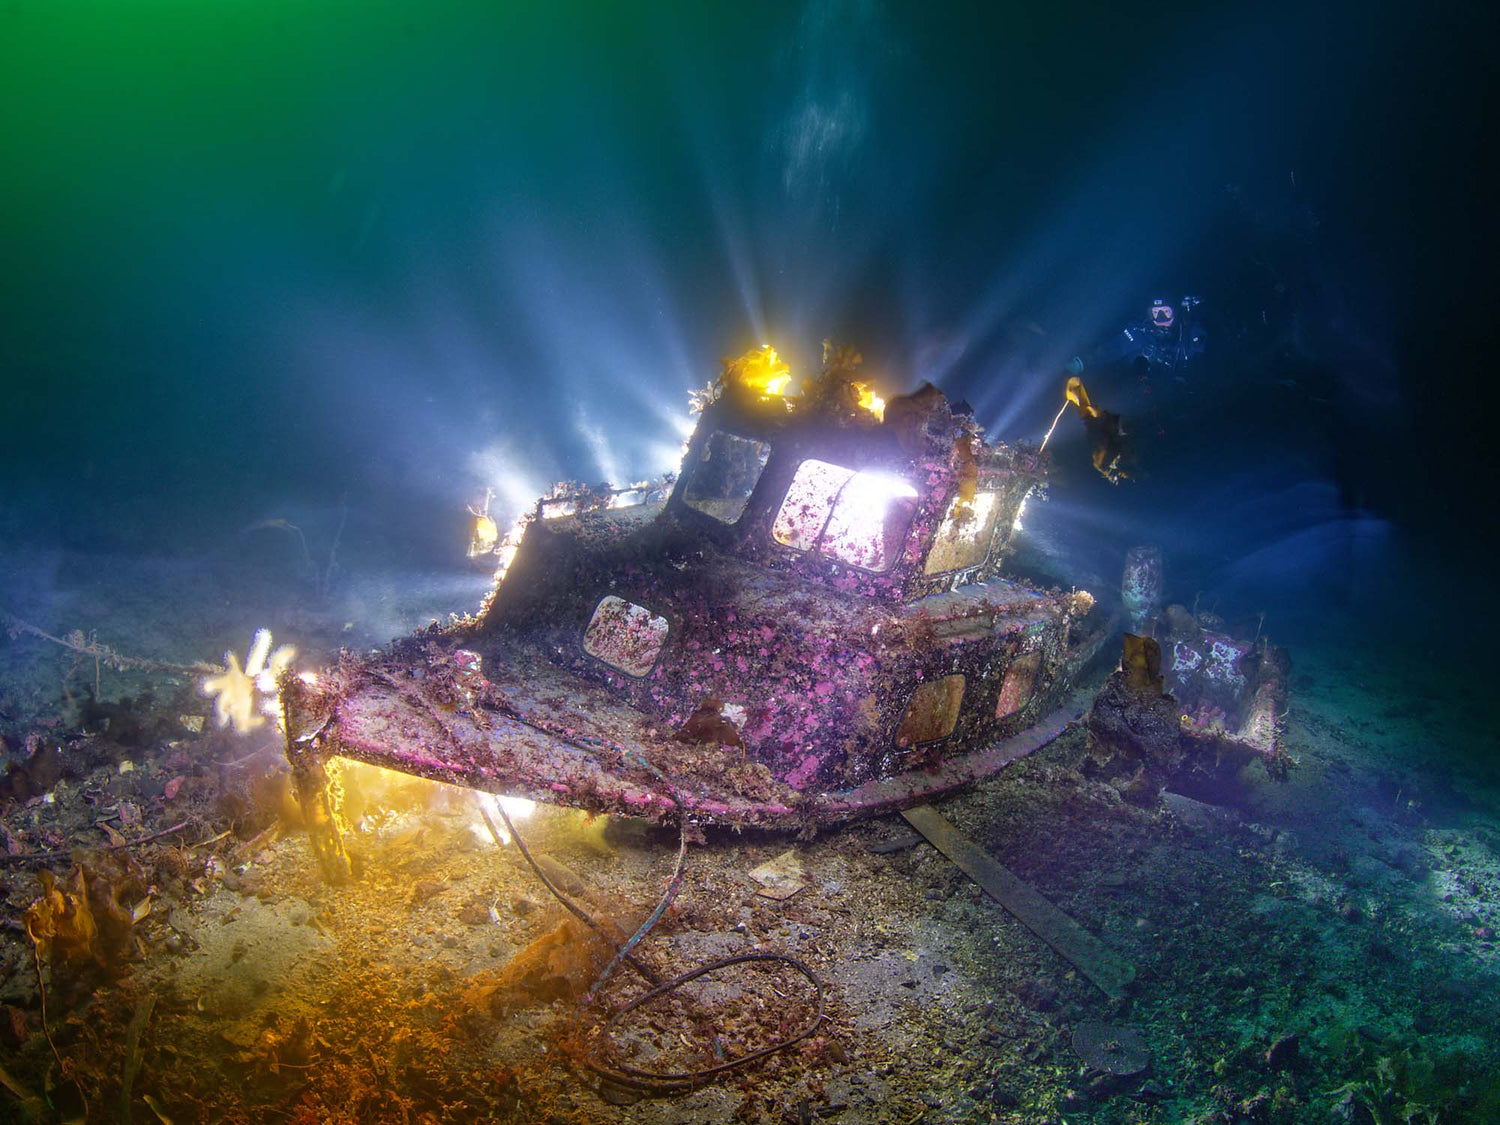
First successful painting picture consisting of nine stacked images. © David Gutteridge
Technique
Open Shutter vs Stacking
My first research into light painting showed the technique using multiple exposures which are later stacked in photoshop. I started by setting the camera to shoot the maximum 9 exposures at 30 seconds.
When I first used this image to enter the Norwegian National Underwater Photo championship, they subsequently changed the rules to not allow for multiple exposures. Whoops.
This is what led me to the rubber band trick and single exposures.
Multiple exposures do give a lot of control over the final image and mistakes can simply be left out.

8-15mm @15mm • ISO 80 • F/8.0 • Shutter 679.5sec // A larger wreck. The wisps of light in the foreground come from the angle of the video light. © David Gutteridge
Diving the Shot
Know the dive site and have a plan
Knowing where you are going to swim and where to focus your light is important. After initial setup you will be swimming in complete darkness from the camera to the subject.
Eliminate light. If you have a backlit diving computer this will need covering, LED lights must be blacked out and any other potential source of light that will be picked up has to be covered. This step should be done before hopping in the water.
Set up the tripod. Use the video light to rig up and focus the shot.
Pre-focus the camera using the video light, trigger, and swim away. So long as there is nothing lighting your subject you can take as much time as you need to get over there.
The swim
I will normally start with the front lighting. Whilst swimming towards the subject I will start lighting the foreground I want to include in the shot. Stay close to the subject and always point light away from camera.
Experimenting with the process will teach you how long to light. Closer subjects will only require a quick sweep whilst further and/or larger subjects will require longer. I try to only light an area once as anything in motion could double expose.
Backlight: Switching to a narrow beam light I swim around behind the wreck. Lighting close to the edge of the subject and into open water in the shot. This keeps the beam narrow and highlights the edges of the subject.
I do this lighting in stages while holding breath. Any bubbles you breathe will light up while you light upwards, which can be seen in many shots.
Turn off all lights and return to camera. End shot. Inspect and try again.

8-15mm @15mm • ISO 64 • F/18 • Shutter 372sec // Shot taken at dusk. © David Gutteridge
I have yet to mention the most important piece of equipment for this: You will need a very patient dive buddy. Someone willing to float around and watch you in complete darkness for most of the dive.

David Gutteridge is a diving instructor, tech diver, freediver, and underwater photographer living in Stavanger, Norway. David primarily shoots wide-angle with wrecks and diver portraits as his preferred subjects. David began light painting underwater as a way to adapt to Norway's 6-months of darkness per year. One day David dreams of visiting the underwater military museum in Aqaba, Jordan to do more light painting. In addition to light painting, David also creates 3D images based on his shipwreck and maritime underwater photographer. See more of David's 3D works on his website, and follow him on Instagram @stavanger_scuba for more. Read more...
Additional Reading
Burst Shooting DS230 Strobes & Canon R7 // Swimming Photography with Kids
Underwater Exposure Explained | Aperture Settings [VIDEO]
Setting the Tone: Color Grading for Underwater Photography
![Underwater Exposure Explained | Aperture Settings [VIDEO]](http://www.ikelite.com/cdn/shop/articles/aperture-underwater-cover.jpg?v=1684500115&width=2000)