


By Ambassador Steve Miller
The idea of a using a natural swimming pool as an underwater photo studio became an obsession shortly after first hearing about these pools becoming popular in Europe. Chlorine is a chemical many people want to avoid, so natural pools are an alternative, even for conversion from a traditional pool.
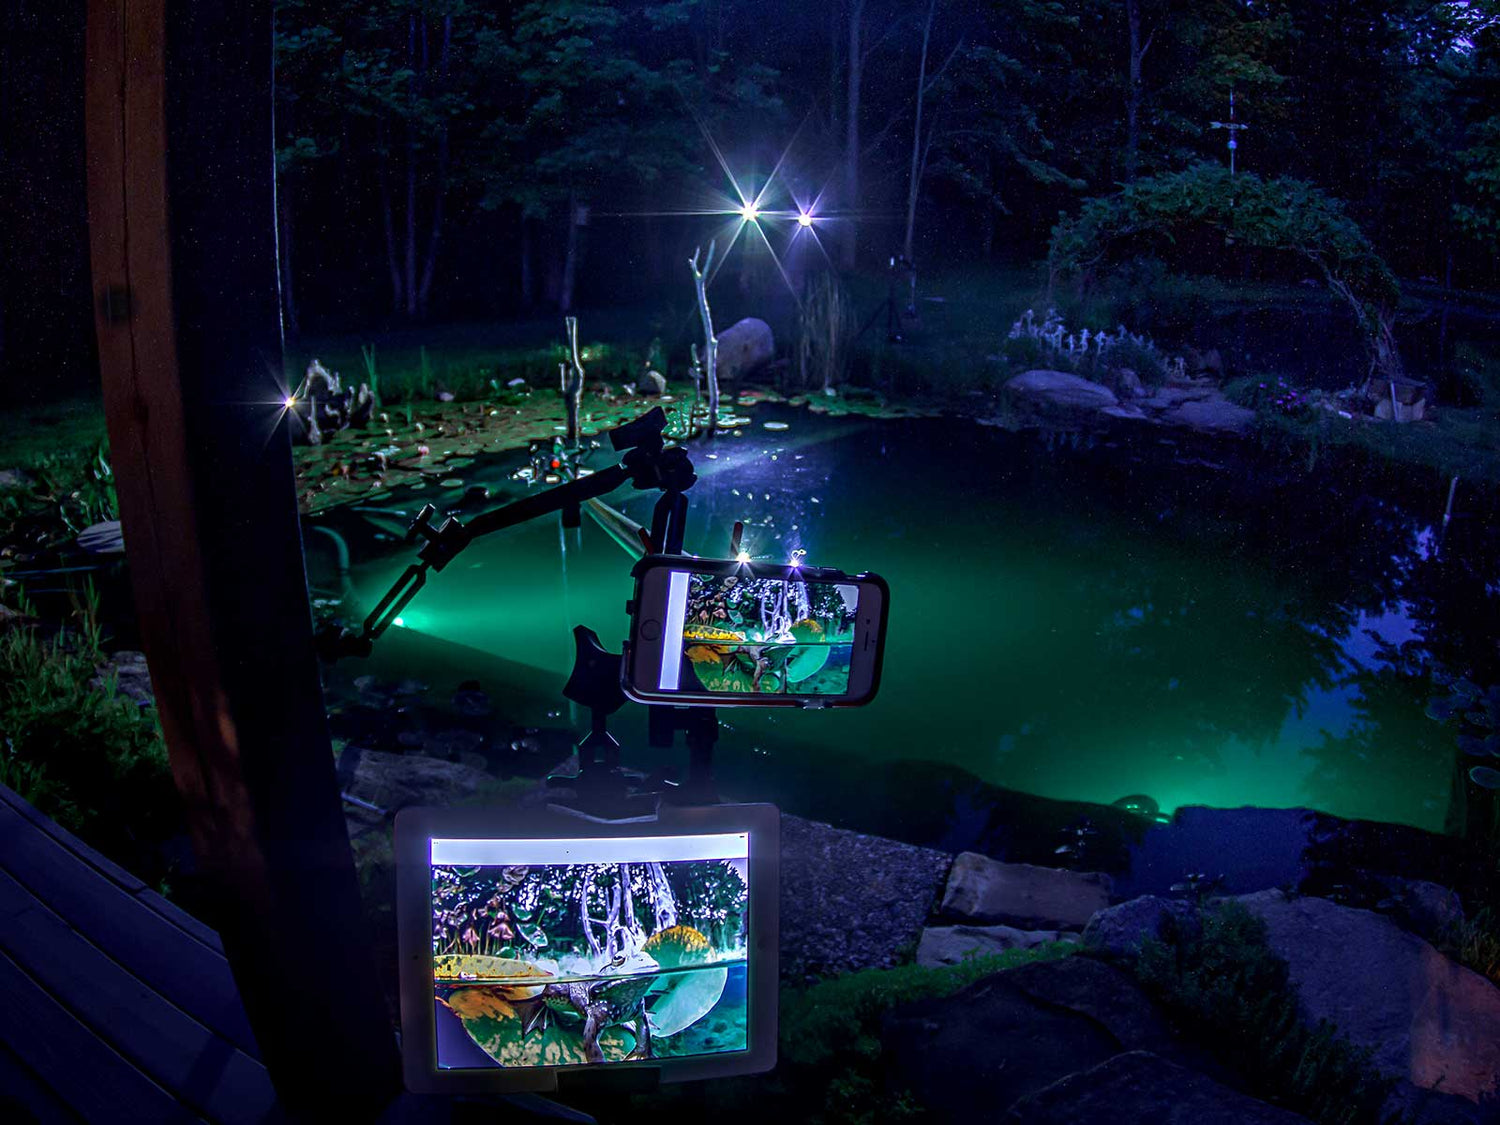
The fact that the water can be crystal clear means we can shoot the same camera and lens configurations here instead of traveling half way around the world. This also means that we have full control of the light, at night in particular, and can produce creative lighting similar to a studio. For testing new products, the pool is much more convenient than a dive trip, and yields more interesting results than a typical swimming pool.

Hardly a remote location, the options for creative lighting are limitless now. In all these years I've barely scratched the surface.
The difference between a natural swimming pool and a typical backyard pool is life. The basic principle for chlorine pools is to kill everything but the people. In a natural pool a balance is achieved between plants, animals, and the nitrogen cycle.
In this setting, the life will find you. An entire habitat with too many species to list here have found their way in to the pool, many before it was done. The only life we introduced were a dozen sunfish to eat the snails (get the Red Ear variety that don't nip at swimmer's) a dozen Bullhead Minnows (frogs will hunt these) and three Paddlefish (a native to this region).
One stocking and you are done- they will all reproduce except the Paddlefish. Soon the frogs, toads, snakes, dragonflies, aquatic insects, etc. will come around as word gets out about this neighborhood oasis.
Version 1 of the natural pool involved lining the bottom and building walls from cinder block to separate the swim zone from the regeneration beds. The beds were filled with gravel and planted. True natural pools typically don't have fish, so to offset this bio-load we use external filtration, including Ultra Violet sterilization.
After 10 years, we ripped out the original pool and replaced it with a hybrid system. The entire re-do took a year and a half, about 50 tons of stone, and an 1100 pound liner. Fortunately the external filtration system already in place was plug and play.

Version 1 pool partially drained. Here you can see how 10 years has caused the regeneration beds to become like a mud bottom, despite the fact that the gravel is over a foot deep. Plants love this but it creates major visibility issues for photography.

Version 1 ripped out. With the walls removed, the entire pool becomes deeper and the water volume almost doubles to around 16,000 gallons.

Version 2 begins. Once the old pool was ripped out - along with 5 tons of clay and gravel - we brought in 50 tons of boulders to make the bottom and walls from solid rock with no gravel. No glue, cement, or foam was used in the project. Everything is dry-stacked and changeable.

Version 2 takes shape. The new shape is defined and the liner sits on a roll weighing 1100 pounds. Getting it into place will take some help.

Version 2 gets lined. After being dug out, a liner was dragged into position.

Version 2 gets built. Placing these monster stones on the liner had to be done carefully, with a pad underneath to avoid damaging the liner. Many of the rocks had to be placed with machines. Since the gutters of the house deliver rain water to the pool, it would take up several feet overnight. A sump pump was used to drain the water to work.

A platform was built on the side closest to the house for tripods and light stands to shoot from water level.

Photo platform and most of the rock work in place, with the pumps turned off the pool will fill quickly with spring rains.

The final step is to place large shallow pots with plants in them all through the shallows, this is key, and it will take a season or two for the plants to establish themselves to the point of creating shade in the summer to reduce algae, and taking up the nutrients to compete with the algae.

Life aquatic. In a young pond, algae blooms are inevitable and come on quickly. Until plants are established there isn't a lot you can do.
Of all the designs I have seen, this is the only one that has some key changes from the original pool. First, there is no gravel- this means you can vacuum everywhere without picking up rocks. Secondly, the plants are all in huge pots. This allows muck to accumulate around the plants roots so they thrive, but you can easily clean around the pots.

(Left) The very first pool was just clay, nice for swimming- but impossible to photograph underwater on scuba with zero visibility. (Right) Final Version 2 with potted plants in place, ideally these will cover close to half of the pool eventually.

Once the plants establish themselves they will shade the bottom, and take up the nutrients that feed algae. This will clarify your water naturally.
This obsession with cleaning is only for the photography. I hate backscatter and low visibility for my imaging. A traditional natural pool with lots of gravel and plants - but no fish - can be a very self sustaining low maintenance swimming hole. Give it some aeration through a bubbler and it will balance itself out. This new configuration requires more maintenance, but it is easier to perform- especially if you go diving in it.

Stay tuned for the next installments in this series as we explore the life that thrives in the pool, how Steve sets up for remote photos and equipment testing, and more.
See more: Backyard Natural Swimming Pool Studio Underwater Photos
 Ambassador Steve Miller has been a passionate teacher of underwater photography since 1980. In addition to creating aspirational photos as an ambassador, he leads the Ikelite Photo School, conducts equipment testing, contributes content and photography, represents us at dive shows and events, provides one-on-one photo advice to customers, and participates in product research and development. Steve also works as a Guest Experience Manager for the Wakatobi Dive Resort in Indonesia. In his "free" time he busies himself tweaking his very own Backyard Underwater Photo Studio which he's built for testing equipment and techniques. Read more...
Additional Reading
Backyard Natural Swimming Pool Studio Underwater Photos
Backyard Underwater Photo Studio
Planning a Trip to Photograph Manatees in Crystal River, Florida