


By Bryant Turffs
Motion blur is an exciting and challenging form of photography. It can be used to enhance your image’s story, lending a sense of movement to fast subjects, like sharks. It can also be used creatively to make abstract photos like the circular blurring of sponges or corals. In short, successful motion blur is dynamic.

Barracuda Accelerated Panning. 1/25th • f/11 • ISO 100 • 10mm Fisheye Lens © Bryant Turffs
Technique
Ideally, motion blur photography requires a camera that can be set to manual exposure mode and one, preferably two, high powered strobes. If your camera cannot be set to manual, you can experiment with shutter priority mode, however, the results will be harder to control. Motion is created by employing a long shutter speed between 1/5th and 1/15th of a second. These are just baseline parameters, however, and a longer (slower) shutter will create extra blur, a shorter (faster) one less. Use this range as a starting point and experiment until you get it right.
A long shutter will let in a lot of light so it is typically balanced with a closed (high F number) aperture and a low ISO. Bright sunlight can overexpose your image with this combination of settings and so motion blur is best practiced on cloudy days, early or late in the day, or behind a shading structure.
A successful motion blur image is composed of two elements, the motion described above, and a sharp subject. The subject is rendered sharp by the instantaneous pulse of light emitted by your strobes, which freezes it in place. Extra strobe power helps here, as does the orientation of the strobes, which will ideally be pointed to illuminate the subject, but not the background.
Motion Blur is challenging. I wind up with many more throw aways than keeper images when practicing this technique. Since blurriness typically ruins a photo, when shooting motion blur you are perched on a thin fence between success and a blurry mess. When you get it right though, motion blur is rewarding, rendering that perfect combination of sharpness and motion in a single frame.

Subject Motion Mosquitofish with Front Curtain Sync. *Note that the trail leads ahead of the fish which is not ideal. More on this below. 1/50 • f/5.6 • ISO800 • 60mm Macro Lens © Bryant Turffs
Motion, begins with the slow shutter, but it can be controlled too. There are two sources of motion in your image. The first is your subjects movement and the second is the movement (or lack thereof) of your camera. There are many techniques to produce the desired type motion within your image. Let's look at several independently.
Subject Motion
To capture subject motion within a stationary scene you want to hold your camera still while the shutter is open and allow your subject to swim through the frame. This will create an in focus background while the subject streaks across the frame. The flash will freeze the subject at one point while its motion blurs away from this point. This type of motion will convey your subjects speed. This is a great technique for subjects like sharks and large fast fish such as barracuda.
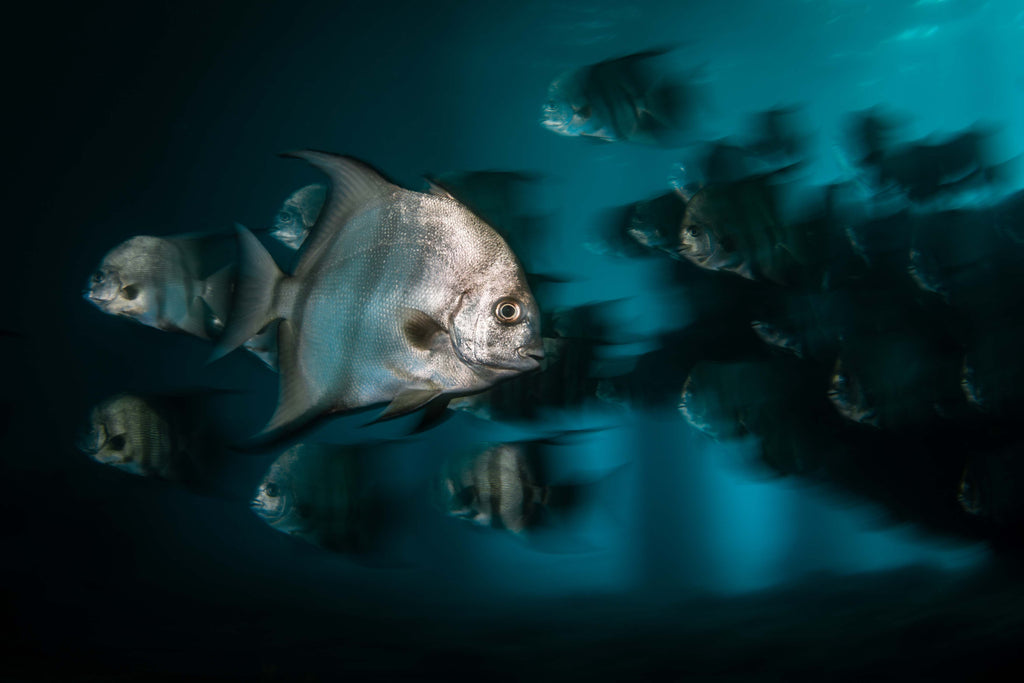
Spadefish Subject Motion - Note how the trails lead behind the fish in the background. 10mm Fisheye Lens © Bryant Turffs
A key technical element of these images is employing rear curtain sync with your flash.
What does mean? Typically, your camera uses front curtain sync meaning, your flash fires the instant that the shutter opens. Imagine that your shutter is open for one whole second. With front curtain sync, when you depress the shutter the flash will fire with the first click as the shutter opens, then, a second later the shutter will close. With rear curtain sync, the shutter will open as you depress the button, but the flash wont fire until a second later, just before the click of the closing shutter.
What does this do? Well, if the flash fires with the front curtain, the subject is frozen at the beginning of the frame and its movement streaks ahead of it. This looks unnatural like the subject is moving backwards. With rear curtain sync, the subject’s motion streaks through the frame and it is frozen at the end. This creates a pleasing comet like trail, emphasizing the subjects motion through the water.
Rear curtain sync is typically set through your camera’s menu. Some compact cameras may not have this feature, and Canon, notably, will not allow you use rear curtain sync with non-Canon brand flashes (annoying since they do not make underwater flashes). Don’t despair though! If you are a fellow Canon shooter, Ikelite’s DL5-DS Link TTL Converter automatically switches to rear curtain sync when you set a shutter speed below 1/30th of a second, allowing you to practice this technique.
*Note: Not all cameras support rear curtain sync.
Camera Motion
Motion blur can also be created by the movement of the camera itself. Camera motion can be used to emphasize the movement of the subject, but is often used to create beautiful creative elements within your image. Typically, when employing camera motion, I will use traditional front curtain sync. Lets look at a few techniques.
Accelerated Panning
Accelerated panning is used to emphasize subject motion. It will result in both a partially blurred subject and a blurred background, where as a steady camera and rear curtain sync as discussed above will yield a sharper background.
Move the camera horizontally left to right (or vice versa) in the same direction as, and faster than, your subject is moving as you trigger the shutter.

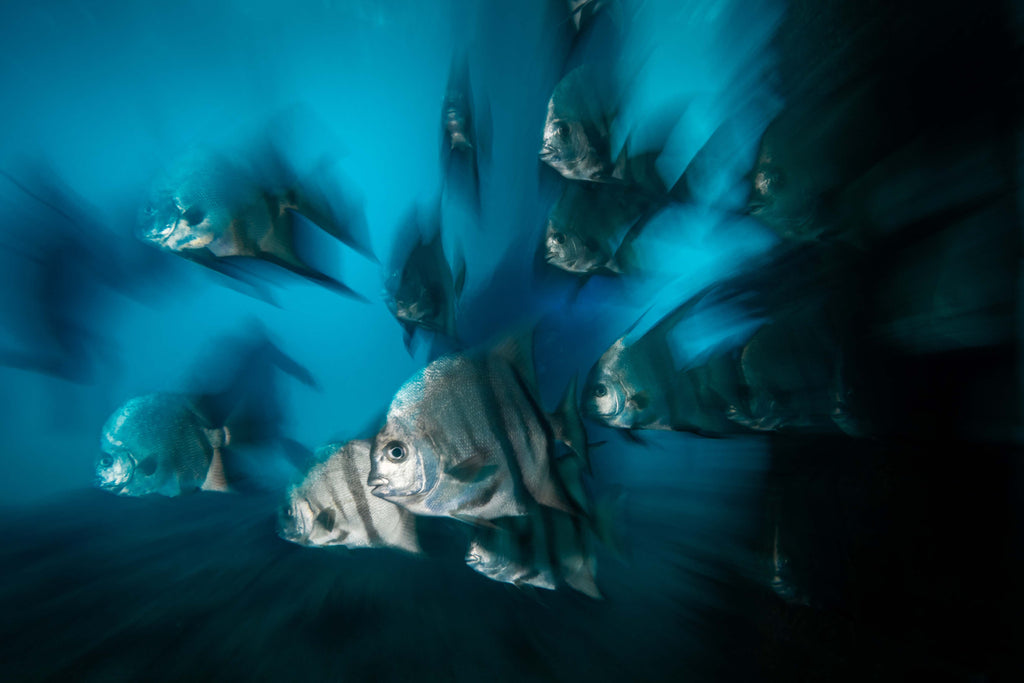
Accelerated Panning Spadefish - Note that both the subjects and the background are blurred with this technique. 1/5th • f/13 • ISO 200 • 10mm Fisheye Lens © Bryant Turffs
Rotation
Rotational panning is used to create a circular blur within an image that adds interest to the frame. Usually, this is employed with stationary subjects.
Point your camera at the subject and rotate the camera about the lens’s axis as you trigger the shutter.
*Consider pointing your strobes inward towards the housing if the subject is near to the seabed to light the subject, but not the background.
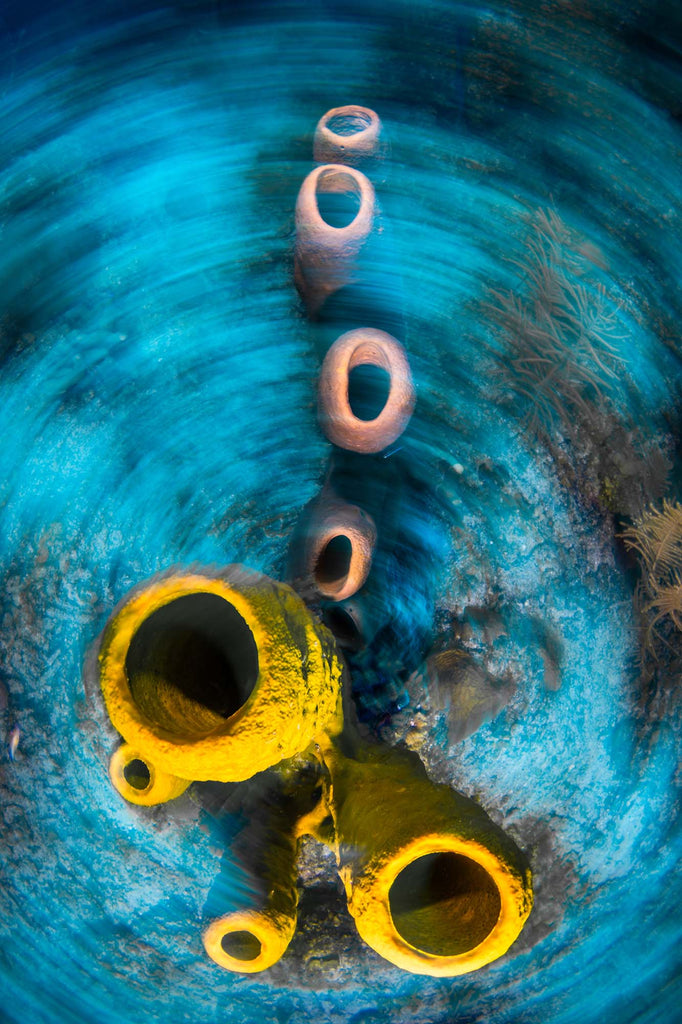
Sponge Rotation Blur - 0.3 sec • f/22 • ISO 200 • 10mm Fisheye Lens © Bryant Turffs
Zoom Blur
This technique creates and affect where the subject appears to pop out towards the camera.
Hold your housing steady, and zoom the lens in as you trigger the shutter. If your lens doesn’t have a zoom function, you can try steadily swimming towards the subject.
Zoom Blur Spadefish - 0.3 sec • f/14 • ISO 100 • 10mm Fisheye Lens zooming towards 17mm © Bryant Turffs
Pro Tips
Motion blur is all about creativity and experimentation. Use the above settings and ideas as a starting point, but don’t be afraid to branch out.
The more stable your camera is, whether you are panning it, or just holding it still, the more success you will have. As such, it is important that your cameras foundation (you!!!) Is steady in the water. Practice your basic dive skills, especially your buoyancy, and you will find more success!
Be steady and be patient! Happy shooting!
 Ambassador Bryant Turffs has worked on six of the seven continents as a biologist, boat captain, dive professional, commercial fisherman, photographer, and educator. Today he lives in Palm Beach County, Florida, and works with his partner, Jessica Pate, to understand the mysteries of the local manta ray population. He also uses his photography to tell other natural history and conservation stories. Read more...
Additional Reading
Underwater Exposure Explained | Shutter Speed Settings [VIDEO]
Get Creative: Unconventional Handle and Strobe Setups
Is It Time to Dump Your DSLR? Going Mirrorless with the Canon R10
Featured Photographer: Bryant Turffs on Looking Deeper
Just Add Light: Enhancing Underwater Photography with Colored Lighting
Dealing with Droplets when Shooting Split Shots
Manual Camera Exposure VS Manual Strobe Exposure for Underwater Photography [VIDEO]
![Underwater Exposure Explained | ISO Settings [VIDEO]](http://www.ikelite.com/cdn/shop/articles/ISO_Settings_Underwater_Exposure_copy.jpg?v=1709251822&width=2000)