


![Sony ZV-E10 // Ikelite 200DLM/A Underwater Housing Assembly [VIDEO]](http://www.ikelite.com/cdn/shop/articles/Sony_ZV-E10_Housing_Assembly_copy.jpg?v=1698332190&width=1500)
By John Brigham
The Sony ZV-E10 is a super affordable compact mirrorless camera with an APS-C style sensor and strong video capabilities.
If you're looking to get this compact camera in the water down to 200ft (60.9m) in a compact housing, check out our 200DLM/A Underwater Housing for Sony ZV-E10 # 69122. This video shows you how to set it up in an underwater housing with the popular 16-35mm f/4 PZ wide angle zoom lens.
Installing an Anti-Reflection Ring
Firstly, I have chosen the 16-35mm PZ style lens - I've been a big fan of this as of late. The first thing I'm going to do before I get too far down the line is I'm going to add the anti-reflection sticker. You'll notice that if you look at the face of this lens that there is predominant white lettering. This can result in light coming in through your port, bouncing off these letters, hitting the inside of the port, and then back into your image - we want to avoid that as much as we can and the anti-reflection ring is your best defense.
To apply the anti-reflection ring, remove it from the backing and I like to choose a spot, in this case the diameter marking of 72 and I will take a peak of the ring, place it there, tag it down, and then just gently walk it around the circumference of the circle, now I have that in place and I don't need to worry about that again. Now take our lens and we'll set it to the side for the time being.

The Anti-Reflection Ring for Sony FE 16-35mm f/4 PZ Lenses is a self-adhesive vinyl label covers the white lettering and ring details on the front of the lens to reduce reflections when used behind a dome port underwater.
Installing the Sony ZV-E10 Inside the Ikelite Underwater Housing
For right now, let's turn our attention to the housing itself. We put the housing down on its port mount. You'll notice there are two locking levers on each side. Push in and lift up to release then lift the hooks over the latch and remove to remove the back of the housing.
If you look inside of the housing, you'll notice there's a camera mount that can be slid out. This camera mount features a 1/4-20 mounting screw that will correspond to the 1/4-20 mounting hole on your camera. Line those two up and use a flat head screwdriver to tighten the camera mount to the camera body. You want to make sure this is nice and snug because any movement that occurs between these two pieces will translate to misalignment in your controls.
You'll notice that there is a slot in the base of the housing, this is where you will slide the camera body with the mount attached into the housing. Make sure no controls - like the lens release, on/off control - are in your way and slide your camera into place.
Turn your attention to the back of the housing. You'll notice that the back is not only clear, which lets you see the o-ring, but the o-ring always takes an outside curve. It's never going in an inside channel, this makes it a very reliable system where the o-ring won't pop out on you.

This is a compression seal which means that you don't have to use lubricant on it. As a matter of fact I recommend not using lubricant because that will just attract any debris.
Run your fingers across the sealing surface, checking for any debris. You'll often feel it before you see it. Do the same thing with the o-ring. Make sure there's nothing on it then replace the o-ring, put it onto the back following those outside curves.
Line the back up with the front, set it into place, then take both of your locking lid snaps and place them over the hooks of the back, and then simultaneously press down and you'll hear them click into place. Do a double check to make sure that when you lift up on them that they don't come open.
Installing the Zoom Gear and Dome Port
Let's talk about installing the lens, the gear sleeve to zoom it, and the port. We've already installed the anti-reflection ring on our lens, so let's go ahead and install the gear sleeve.
We'll set our housing so that the port mount is facing up. We're going to take our lens and our gear sleeve and you'll notice on the gear sleeve it says front with an arrow - that's going to face away from the camera body.
Take zoom gear and slide it onto the lens. It's an interference friction fit so just gently walk it around and slide it all the way forward. Line up and the white dot on the camera body with the white dot on the camera lens and bayonet it on just like you would any normal lens. Take that zoom gear sleeve, push it down into the port mount. Now we can attach the port.
Attaching the port is simple. This is a piston seal, meaning that lubricant will be used to overcome the friction, so you're going to run a small amount of Ikelite lubricant around the o-ring of the port mount. What you want to do is apply that lubricant so it's shiny, but you're also feeling for any debris here.
Next turn your attention to the port, you'll make sure that you don't have any debris along the sealing surface and that all three thumbscrews are backed out and not protruding to the inside diameter here. Apply a little bit of that lubricant to the sealing surface as well.
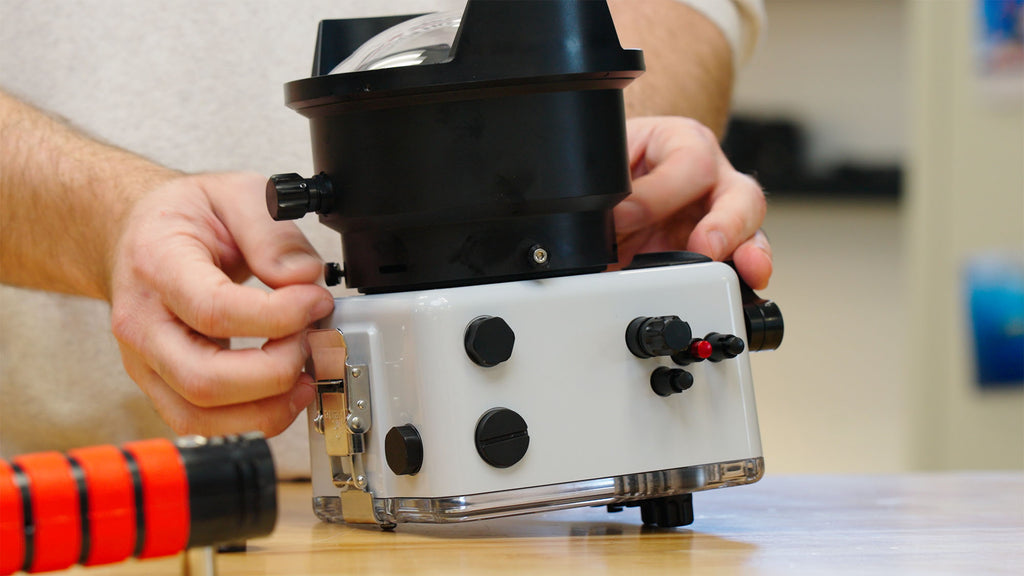
There's no wrong way to put this port on as far as it's placement, but I like to have the drive gear off to my left hand side when using the housing, that way I can keep my hand on the shutter and then my zoom driving gear on the left.
Slide your port on and simply glide it down into place until you feel it bottom out. At that point, tighten the three thumbscrews until they’re finger tight. You don't need to over tighten these - the thumbscrews are not creating the seal - the seal occurred when the two pieces went together. The thumbscrews just keep the port from getting pulled off.
Adding a Trigger Extension
Now we can take our housing and set it down on it’s bottom. For accessories we recommend the Dual Tray, Handle, and Trigger Extension. The dual tray and handle provides not only two handles but two mounting points for strobes or lighting. The trigger extension makes accessing the lever more ergonomic when using the handles.
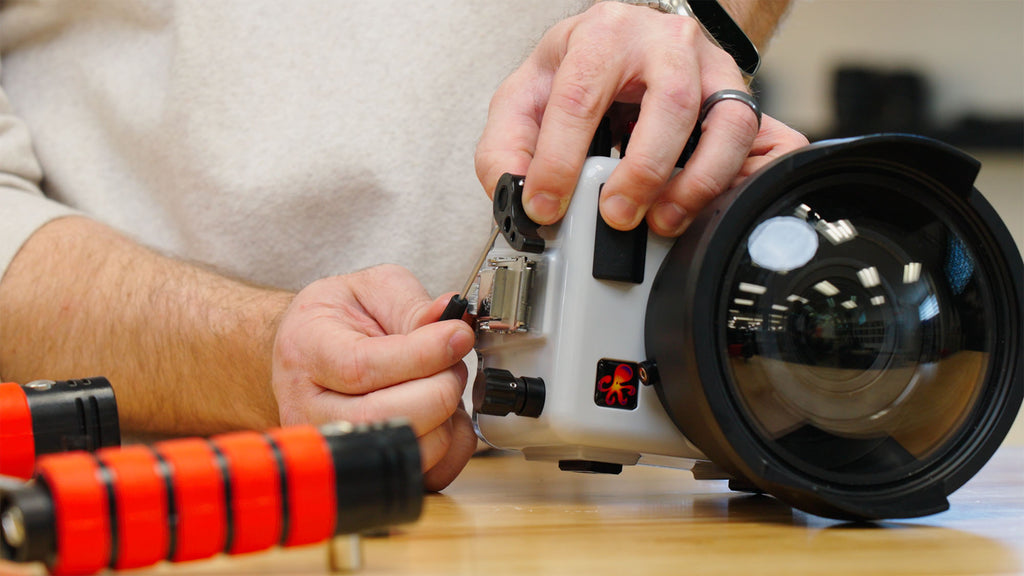
I like to add the trigger extension before putting on the tray and handle as this makes assembly a lot more simple.
In order to do add the trigger extension we’re simply going to loosen the two thumbscrews that are in the lever, one on each side. Take your extension and make sure that the set screw is not protruding to the inside diameter where you put this set screw for the extension doesn't matter.
At this point you have an octagonal shape to this extension as well as the lever so it gives you some choices on how you want to orient the trigger lever. This is a personal preference thing for me. Once you've picked your desired orientation put the lever on and tighten both of the set screws down and making sure they're relatively snug without overdoing it.
Adding a Dual Tray and Handle
Now we're going to add the tray and handles. In order to do so, I take the housing and put it upside down. You notice on the bottom of the tray and a handle that there are two holes, that's what we're going to be using for the mounting locations.

When attaching your tray and handle make sure the quick release buttons for your strobe arms will be facing toward you when you have the housing in use.
Then take one of the shoulder washers and screws, align it, and get the thread started into the bottom mounting hole of the housing and repeat on the other side. Once you have both sides partially threaded and aligned, go ahead and snug up both sides using your flathead and screwdriver.
Optional Port Accessories
From this point there are a few more helpful accessories I would typically add but that won't be covered in this video. We'll do a quick run through of these options so you know what's available.
You'll notice that if you take a close look at the housing, you have a 1/2-20 plug toward the front side on the top of the housing, an M-16 port plug toward the back side of the top of the housing, and another 1/2-20 port on the side.
I would add an Ikelite bulkhead that leads to a hotshoe so that way I can trigger my strobes from plug located toward the front on the top of the housing. I would also add our USB-C bulkhead to the plug located toward the back on the top of the housing.
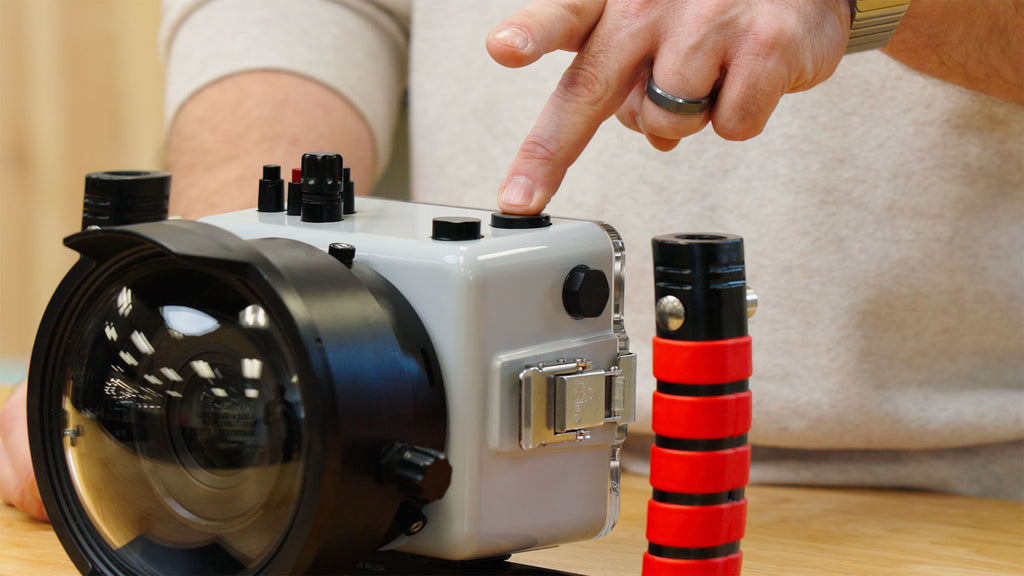
The plug toward the back top of the housing is ideal for the USB-C bulkhead. USB Charging & Data Transfer Bulkhead allows me to recharge my camera and offload images without ever having to open the housing.
Lastly, I would add a vacuum valve to the plug on the side.
That would allow me to create a vacuum inside of the housing that would reinforce all of the closing mechanisms and it would ensure that I didn't forget an o-ring or anything simple during the assembly procedure.
As always, if you have questions about assembling this housing, or any other Ikelite equipment contact us today.

John Brigham is the Vice President & head of product development at Ikelite. He was born with a flair for design and an entrepreneurial spirit as son of Ikelite founder Ike Brigham. He worked his way up in the business and is a natural fit in the R&D side of things. John dives the equipment as much as possible to test product and put himself in the "fins" of the user. You may also find him on the other end of an email or phone call when you reach out for product advice and support. When he's not underwater he's flying drones, setting off rockets, training his German Shepherd "T2", and spending time with his family.
Additional Reading
Installing a DC Series Dome Port on your Compact Underwater Housing [VIDEO]
Sony PZ 16-35mm F4 Lens // Zoom Gear Installation DLM/A Underwater Housing [VIDEO]
Choosing the Right SD Card for Photos and Video [VIDEO]
Manual Camera Exposure VS Manual Strobe Exposure for Underwater Photography [VIDEO]
Get Creative: Unconventional Handle and Strobe Setups
Never Take Your Camera Out of the Housing! // USB-C Charging & Data Transfer Bulkhead [VIDEO]
![Installing a DC Series Dome Port on your Compact Underwater Housing [VIDEO]](http://www.ikelite.com/cdn/shop/articles/dc-dome-port-cover.jpg?v=1697736754&width=2000)
![Replacing Control Gland O-Rings on an Ikelite Underwater Housing [VIDEO]](http://www.ikelite.com/cdn/shop/articles/Replacing_Control_Gland_O-Rings_copy.jpg?v=1698367689&width=2000)