


![TT5 Canon TTL Fiber Optic Transmitter // Setting it Up [VIDEO]](http://www.ikelite.com/cdn/shop/articles/tt5-ikelite-canon-ttl-fiber-optic-transmitter.jpg?v=1711078682&width=1500)
Ikelite TTL exposure algorithms for underwater strobes has been famous for accuracy since the dawn of digital. Now you can enjoy the most reliable Canon TTL strobe exposure with a fiber optic connection between your Ikelite housing and DS strobes.
Installing the TT5 Transmitter on your Ikelite underwater housing is easy. Watch the video below or scroll down for written instructions and photos.
TT5 Canon TTL Fiber Optic Transmitter # 44701
RC2 TTL Receiver for DS Strobes # 4414
How to Install the Fiber Optic Transmitter
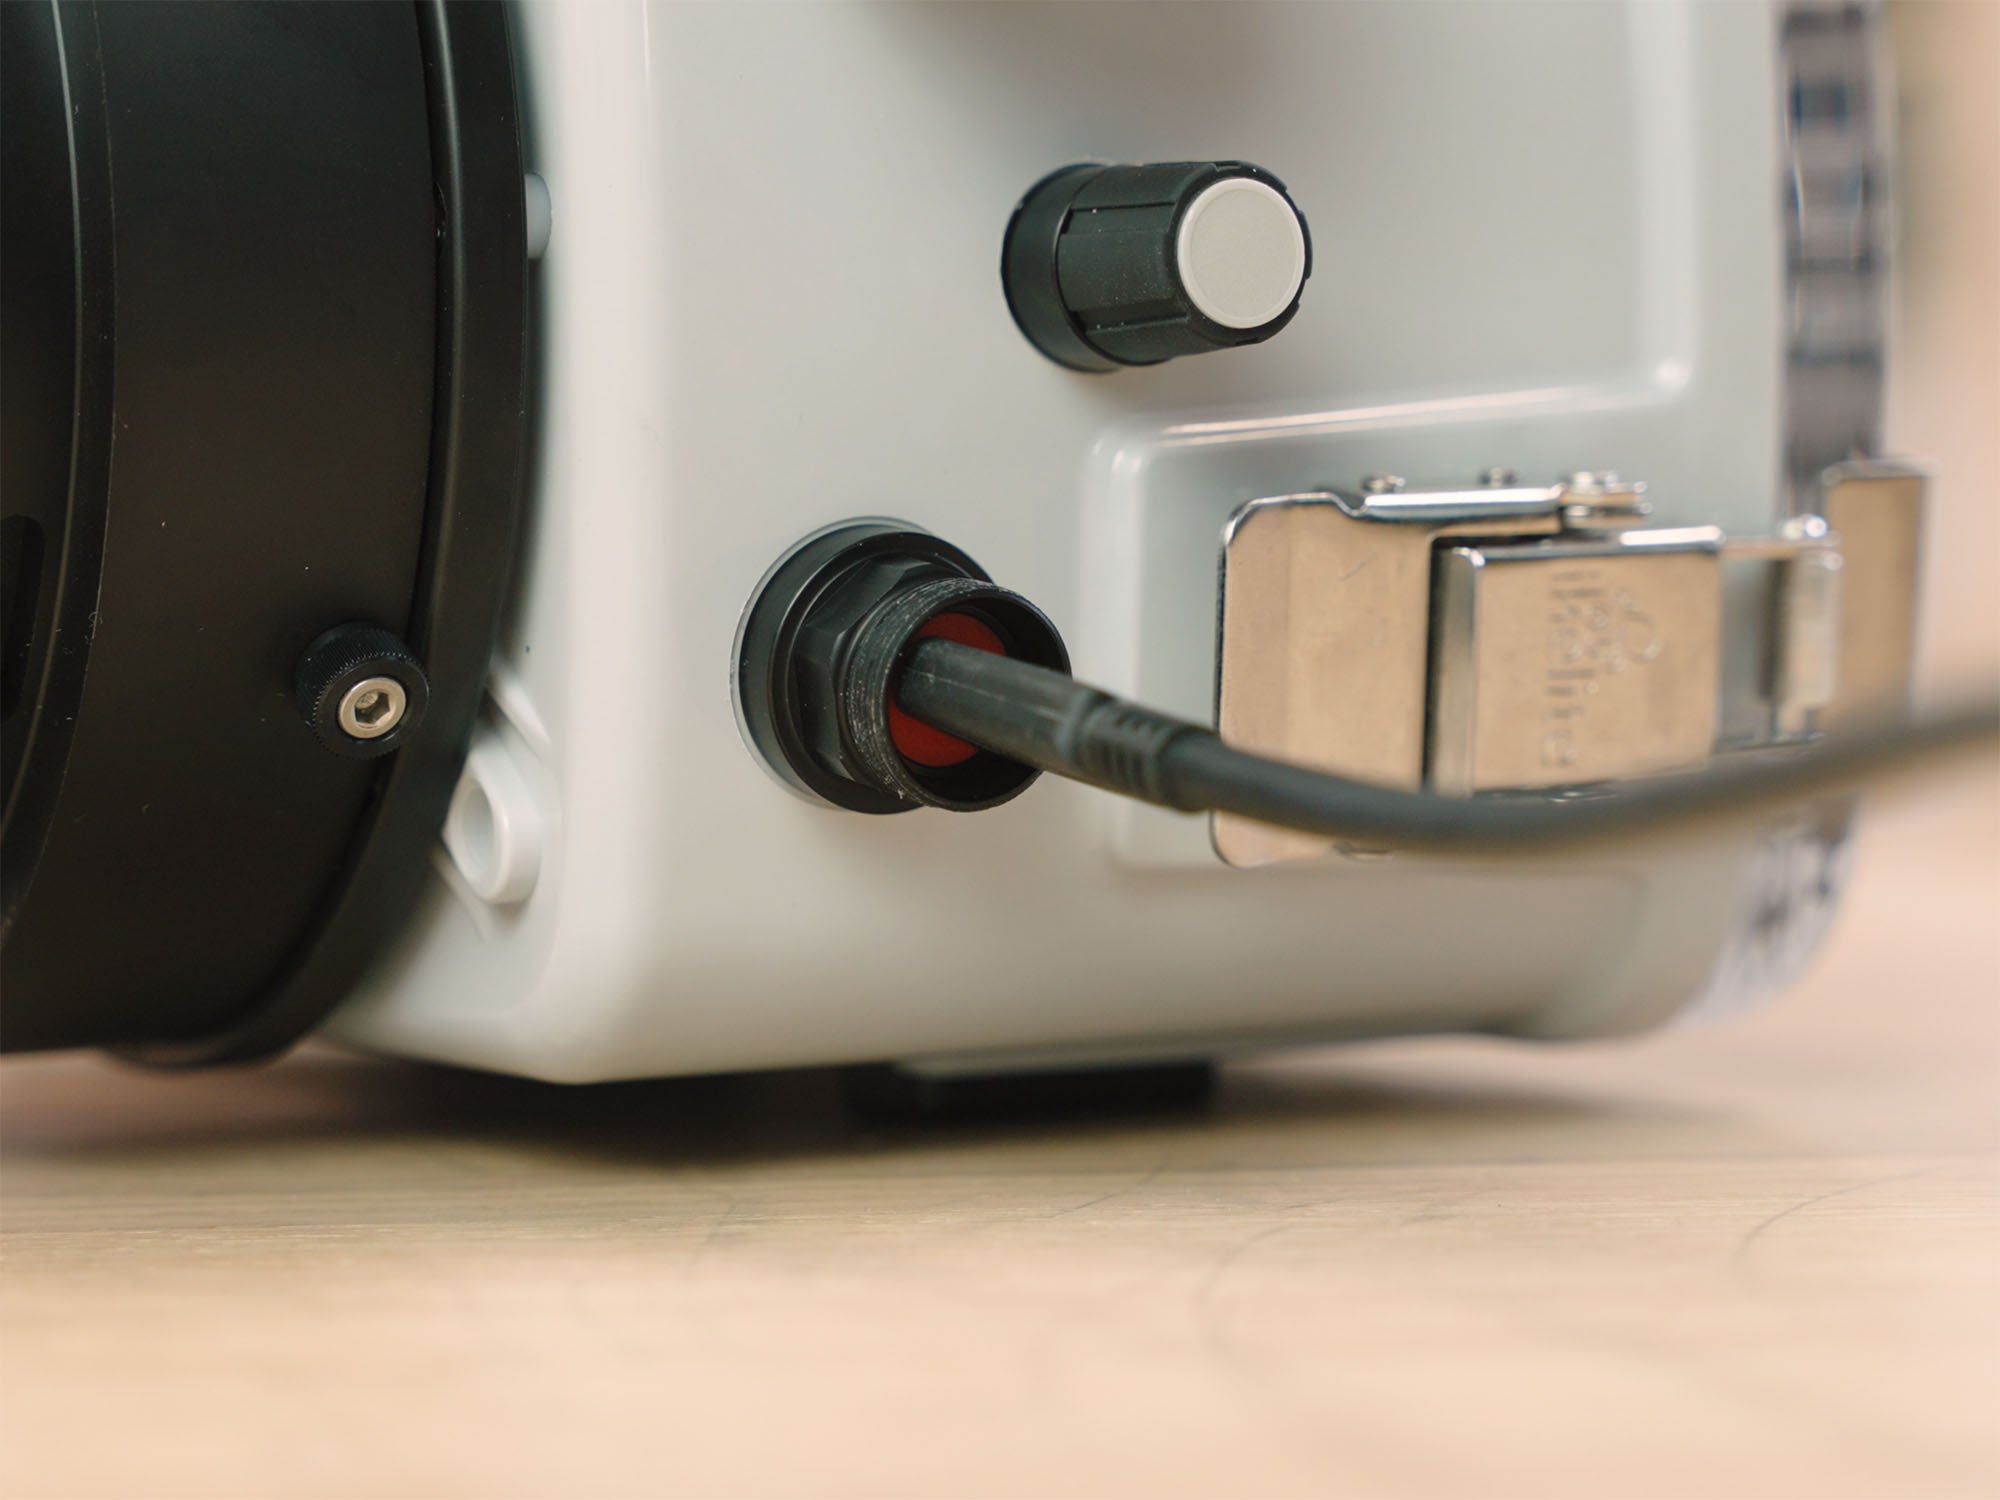
Remove Bulkhead or Plug from Housing
Note: The Canon TTL Fiber Optic Transmitter is designed for Ikelite Underwater Housings and is unlikely to work with other housings.
- If your housing has a bulkhead and hotshoe, disconnect the hotshoe from inside of the housing by unlocking the quick-disconnect tab. Save the hotshoe to plug it into the manual fiber optic transmitter.
- Remove the retaining nut from the bulkhead on the inside of the housing using a 5/8" wrench.
- Remove the bulkhead, or plug, from the top of the housing using an 11/16" wrench. Store the bulkhead in a safe place. You will need the electrical bulkhead if you ever want to go back to using an electrical sync cord.
- Check the that the sealing surface around the hole in the housing is clean and free of debris.

Before installing the transmitter it's important to double check the bulkhead hole for any debris. You want this sealing surface to be completely clean and very lightly lubricated.
Install the Transmitter
- Remove the nut from the transmitter and set aside.
- Check the o-ring on the transmitter for any debris then apply a very small amount of the provided Ikelite Lubricant to your finger - a little goes a long way with this lubricant. Apply the lubricant to the visible surface of the o-ring. You do not need to worry about lubricating the part of the o-ring you can’t see. Apply the rest of the lubricant from you finger to the sealing surface on the hole on the top of the housing.
- Insert the two leads from the transmitter into the hole on the top of the housing.
- Use your fingers to thread the transmitter into the housing. The fiber optic ports provide a really easy place to grip this and get some leverage. Do not use tools or over-tighten. Just make sure it is reasonably snug.
- Thread the nut onto the transmitter from the inside of the housing.
IMPORTANT NOTE:
This retaining nut prevents the transmitter from loosening on its own. The nut does not secure the transmitter to the housing. The transmitter has already been tightened onto the housing creating the o-ring seal.
When tightening the nut, you must hold the transmitter in place on the top of the housing. Tightening the retaining nut without securing the transmitter will break the waterproof seal and result in a leak. Do not over-tighten the nut, just turn until snug.
It is recommended to dive without a camera the first time after installing the Manual Fiber Optic Transmitter. We also recommend using a vacuum system to check for leaks every time you assemble your underwater housing.
Install the Flash Hotshoe
- Align the hotshoe connector with its reciprocal port on the transmitter and press together until it locks.
Make sure the batteries are in the correct orientation during installation.
Install the Battery Holder
- The holder opens for you to place your batteries inside. When installing your CR2032 batteries, ensure you’ve properly oriented your positive and negative battery terminals with the corresponding positive and negative positions as marked inside the battery holder.
- ON/OFF switch: Flipping the switch off after every day of diving is good practice and will give you superior battery life. But the power save on the transmitter will easily allow your batteries to last through a week of driving without switching them on and off each day. Of course, it depends on how many flashes are getting out, but you should have no problem if you forget to turn it off in between diving. The important thing is to remember to have it switched to the ON position when you have your camera inside of the housing and want to take photos.
- Turn the switch to the ON position and slide the battery holder in the bracket.
- Connect the wires – red to red, black to black – to power the converter.
- Dry fit the bracket for optimum spacing before adhering the bracket to the inside of the housing. You want to make sure that you're attaching it to a place where it's not going to interfere with your other controls or wires on your housing. You'll also want to ensure it's located in a place where you'll be able to easily switch it on and off and slide the battery holder it in and out of the bracket when you eventually need to exchange the batteries.
- Once you've found an appropriate place, remove the protective backing on the adhesive and stick it firmly on the inside of the housing. Press and hold it for just a little bit to let it set. For the most secure bond, allow this to set somewhere cool for at least 24 hours.
The TT5 is designed to conserve batteries but it is a good idea to turn it off when not in use and to travel with a spare set. We prefer rechargeable CR2032 batteries which are widely available online.

You don't want to attach the bracket adhesive in a rush. Make sure you have enough time and a cool area to allow your housing and battery bracket to set while the adhesive cures. This will ensure a long lasting attachment.
Set Up Your Camera and Strobes
Your Ikelite DS Strobes each require an RC2 TTL Receiver # 4414 to interpret the flash signal emitted from the TT5 Transmitter.
- Attach the hotshoe to the top of the camera. Ensure it is forward until it stops and has a secure connection.
- Drop your camera into the housing, reposition your controls and safely tuck your wires. Attach the back of the housing.
- Attach an RC2 TTL Receiver to the strobe bulkhead.
- Attach one end of the fiber optic cord to the RC2 TTL Receiver and attach the other end to the Fiber Optic Transmitter on your housing.
- Turn your camera on and have it set to enable external flash firing.
Any Questions?
We want to help you get the results you're looking for underwater. If you need more guidance, reach out today. Happy shooting!
Additional Viewing
Unlock Flash Exposure Compensation for Greater Creative Control
The Myth of TTL Strobe Exposure Underwater
Manual Camera Exposure VS Manual Strobe Exposure for Underwater Photography [VIDEO]
Shooting Underwater with a Single Strobe Flash
Burst Shooting DS230 Strobes & Canon R7 // Swimming Photography with Kids