


By Steve Miller
I have always set my white balance to Auto when shooting underwater and secretly thought I was just being lazy. A proper white balance setting transforms an underwater image in a much more important way than a topside one. This is because our underwater images are always tinted.
This article is supposed to be about how to manually white balance your camera underwater so your still images don’t have that (typically) green or blue tint, with or without a color correction filter. However, the tint of the underwater image is affected by depth, distance to subject, and position in relation to the sun. Let's say you set manual white balance on a particular scene underwater. As soon as you change depth or the tilt of the camera, your white balance will be off or shifted. So you may have to balance again, and again, and again... Instead, we'll dig into the why and how of Auto white balance. But first, let's get down to basics.

Some photographers consider white balance, tint, color temperature, and saturation to be tools that one can take or leave as we please. Underwater images will almost always have a color cast, how you treat this cast is part of the artistic process. © Steve Miller
What is White Balance?
White balance (referred to as WB on most digital cameras) is a setting that adjusts color casts in your photo. Basically you calibrate the camera so that any objects that are white in person will be rendered as white in your photo. In layman's terms, it helps your photos appear more natural. On the surface color casts can come from a lot of different things, for example incandescent or fluorescent lighting, clouds, etc. Underwater we are balancing out the way different wavelengths of light are absorbed as they travel through the water. This absorption creates a loss of reds, oranges, yellows, and purples. White balance aims to neutralize these color casts.

Green, green, green. Freshwater photographers are very familiar with green color cast. Shifting the white balance can make your visibility look more clear than it really was. © Steve Miller
Auto White Balance
Sometimes the Auto settings on our cameras are there for good reason. When shooting stills underwater, you have a limited time to select the best settings for each shot. Typically manual white balance is not the best use of this time.
When we shoot in RAW (instead of just JPEG), it is as if all of the possible white balance temperatures are captured within each photo file. Once you import the RAW file into Adobe® Lightroom you can use the white balance slider to change the white balance temperature. This is a key step to improving most underwater images, regardless of the visibility. You can adjust the white balance on a JPEG image too with some sacrifice of image resolution.
Pro-tip: You'll want to make the white balance adjustment very early in your editing process, before you start changing contrast, saturation, and other settings.

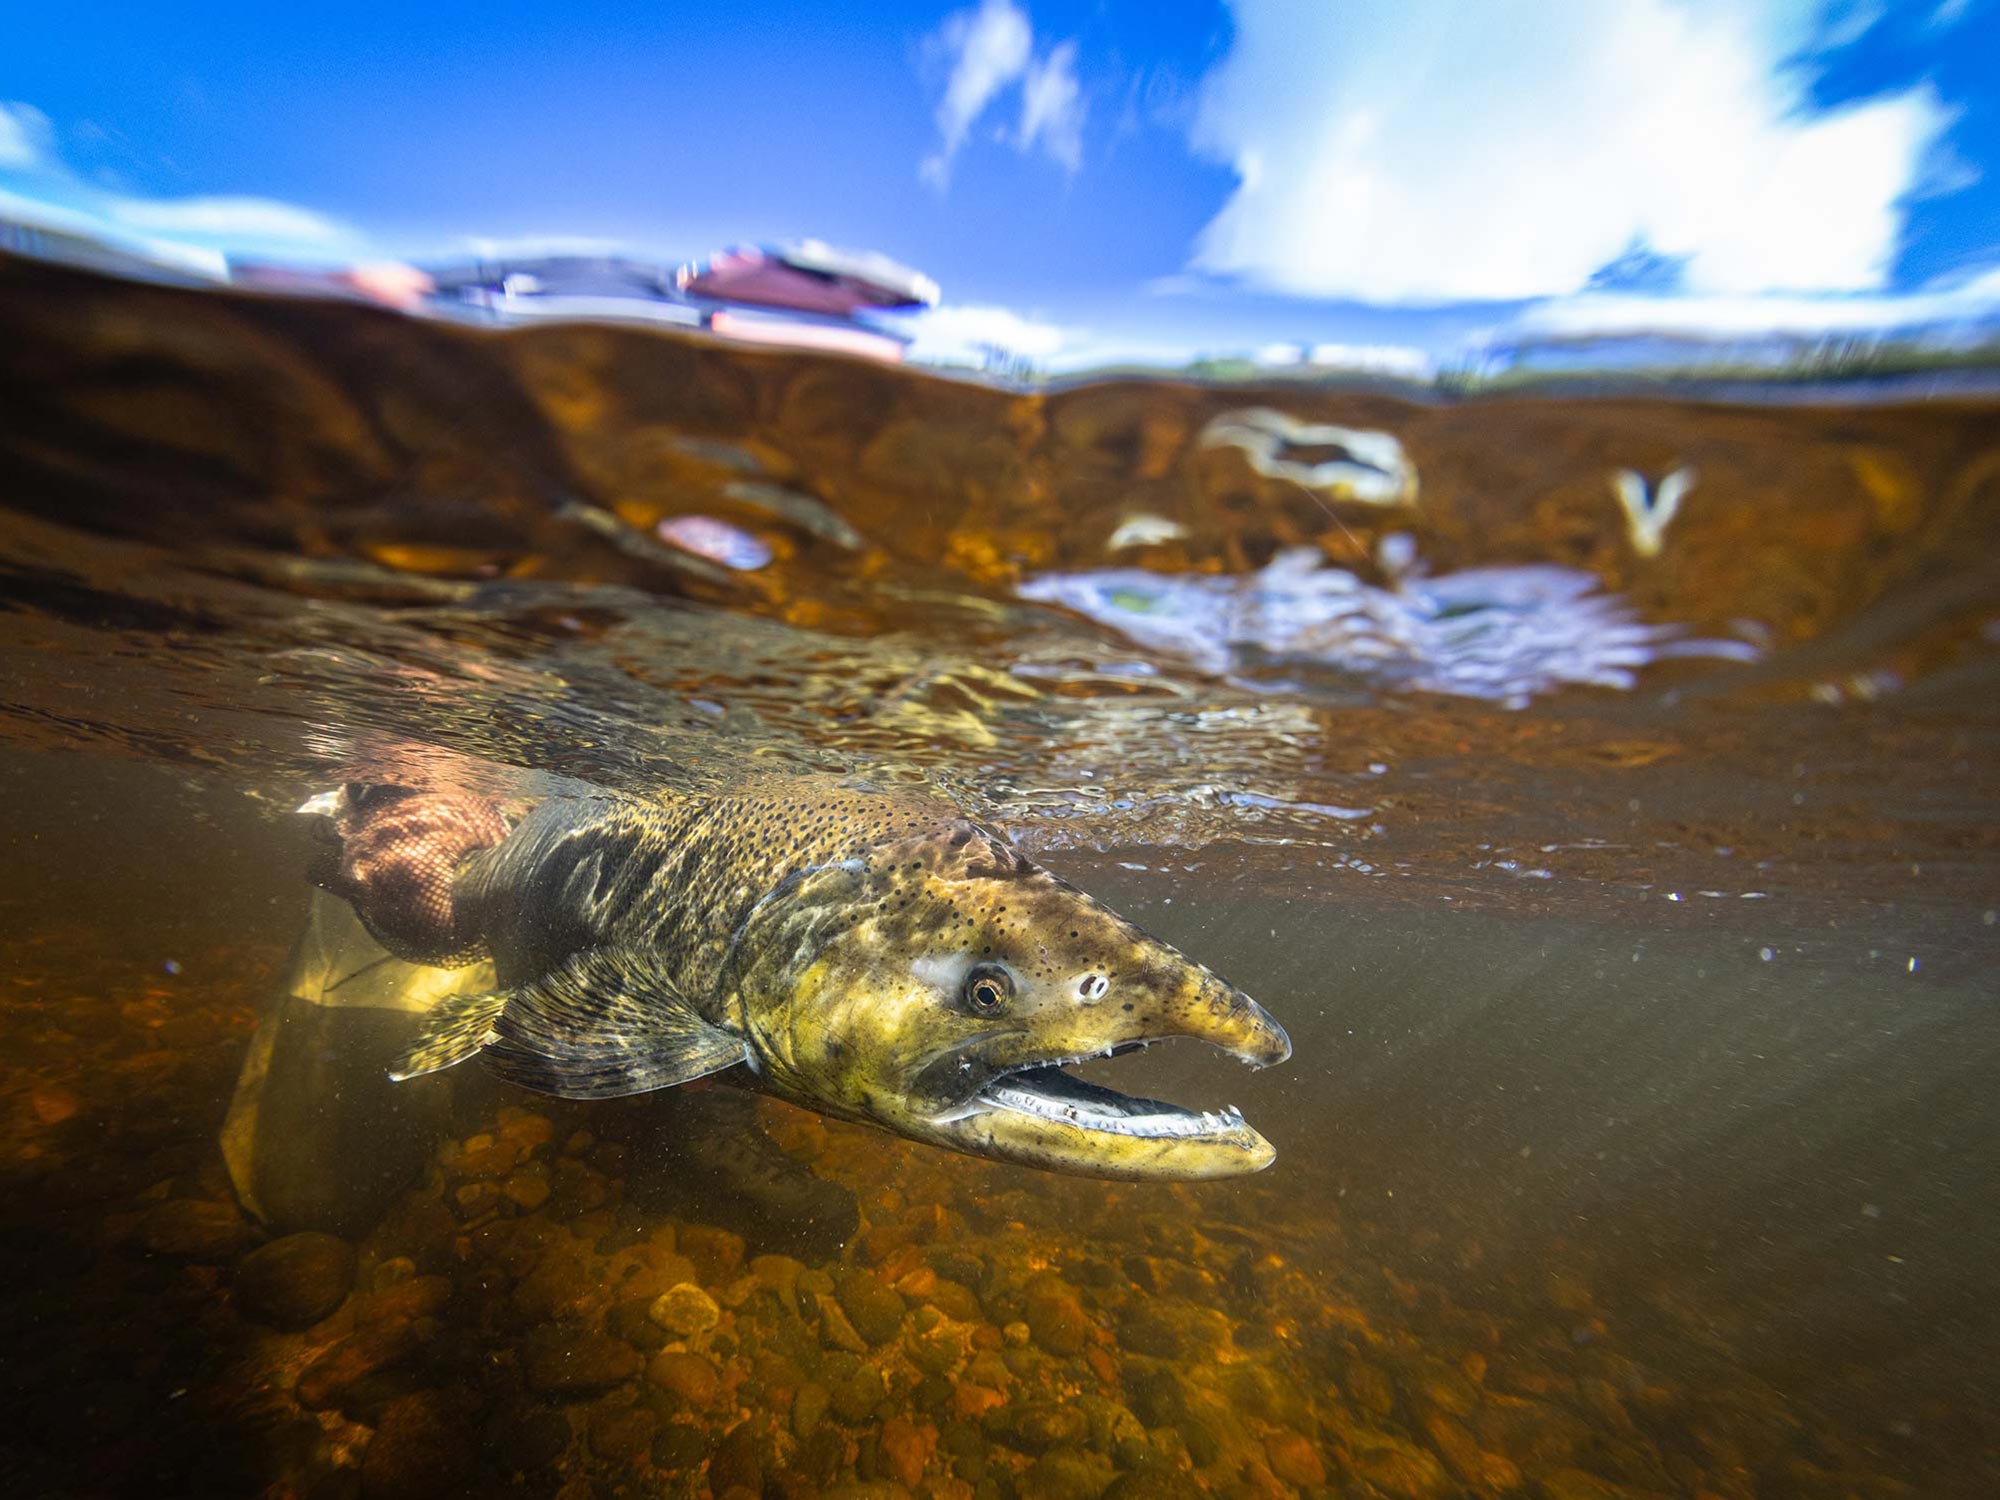
This is the color temperature, or tint, that the camera selected when white balance was set to Auto. We are at the surface, with great visibility, and a lot of bright, overhead sunlight. The color shift underwater is immediate, even when shallow. © Steve Miller
White Balance in Post-Production
You've set your white balance to Auto in-camera and now it's time to adjust those images in Lightroom. Warming up the white balance (lower numbers in degrees Kelvin) will add warm tones to the image globally. A warmer color temperature will neutralize an overly blue toned image. But, your subject may not need as much white balancing as your background or vice versa.
The solution is to apply white balance to separate areas using brushes or masking. Essentially, you can apply a different color temperature to your subject than to the open water or background. The latest updates to Lightroom make selecting your subjects easier than ever before and can make white balancing fast and easy in post-production.

Let's talk about color temperature. The lights of the house in this image are not orange, but compared to the temperature of the two strobes used here to light the bottom half of this split-shot, they appear to be. If you wanted to "correct" this, you would have to apply white balance with a brush or mask. Easy to do, unless you prefer the tint. © Steve Miller

Using a brush and the white balance slider in Lightroom allows you to apply colors to your clouds. © Steve Miller
White Balance is in the Eye of the Beholder
Once we consider white balance to be a tint, or color cast, we can do whatever we like for artistic effect. There is no wrong or right. Correcting color to look natural (what the eye sees) is one methodology, while another might be to play deeper into a specific warmer or cooler tints. Desaturating your images to an extreme can remove all traces of your color cast and can help make your images bolder with more contrast. Whether you want to naturalize your image or accentuate a color tone, focus on your white balance adjustments in post-production. Let your camera take the reins with Auto WB while you're underwater.

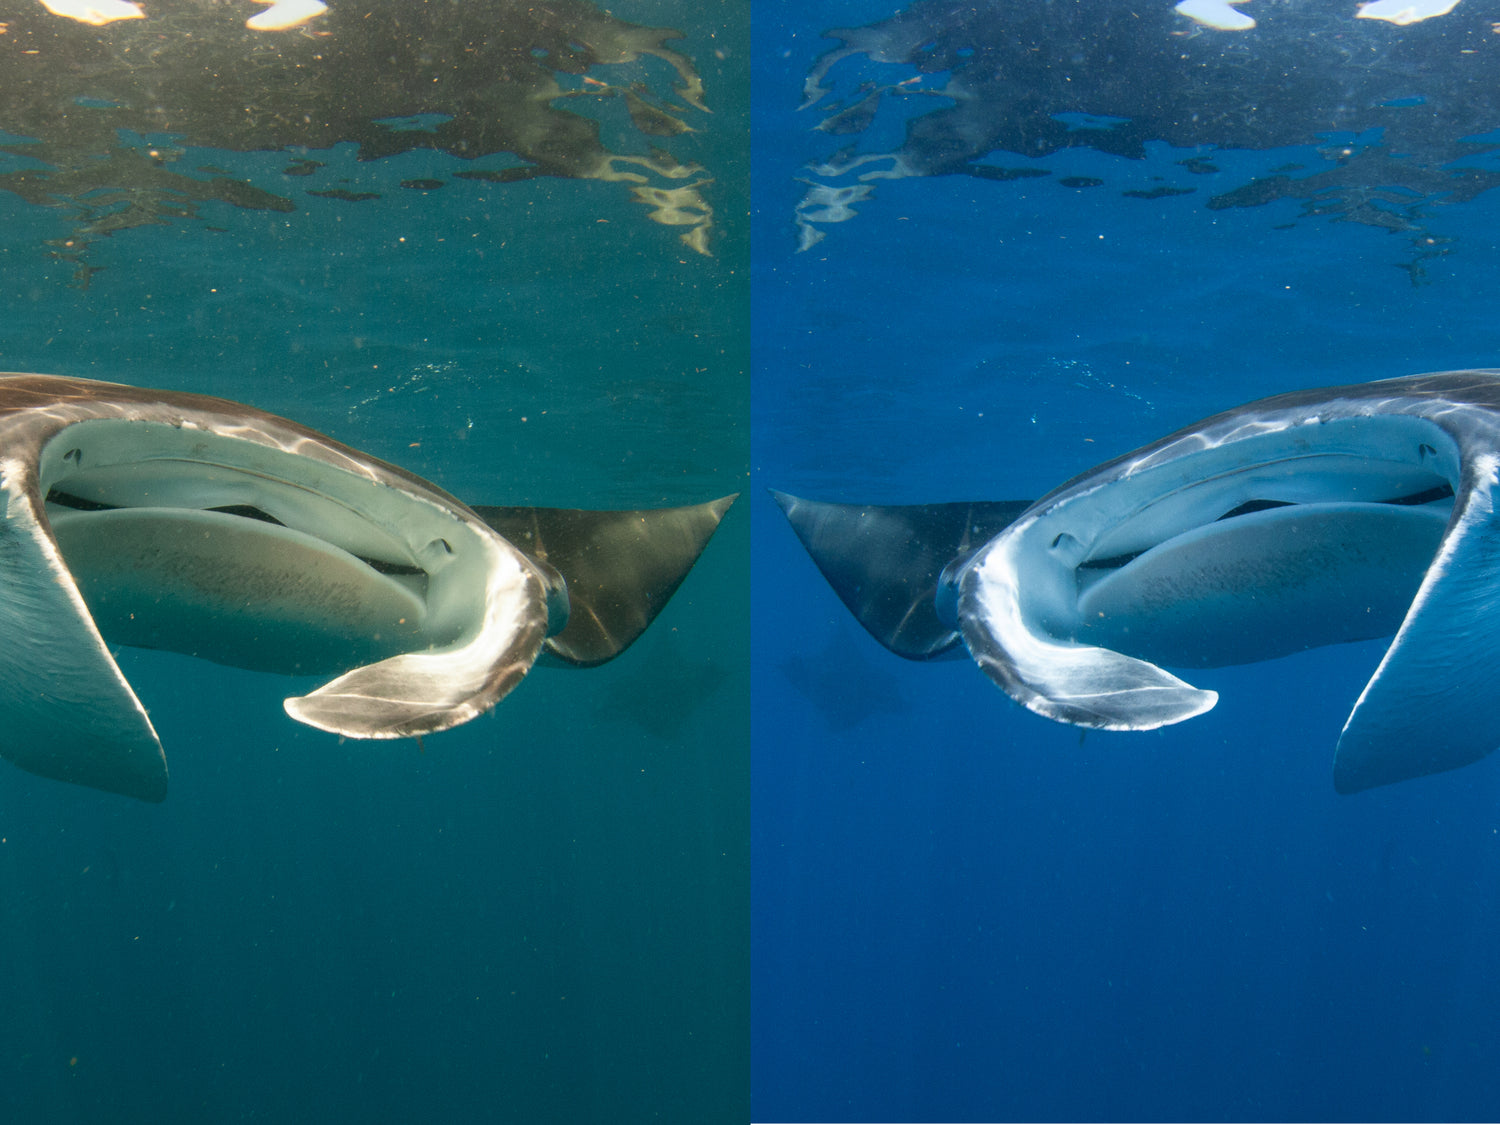
Without any white balance adjustment this photo has a green tone which can make the water appear murkier. © Steve Miller

Once adjusted for white balance, this image has a clearer and cleaner appearance, and it helps the subject pop. © Steve Miller
Diving Deeper into Color Theory
If you are primarily shooting video underwater and have read this far, then we apologize. The files you capture on video do not have the same ability to accept changes that RAW still images do. Many serious videographers will use manual white balance, along with color correction filters - sometimes on the lights as well as the lens - to "naturalize" these color shifts.
If you're looking for more information on color theory and color grading, check out our interview with Brandon Verdura Setting the Tone: Color Grading for Underwater Photography.
 Ambassador Steve Miller has been a passionate teacher of underwater photography since 1980. In addition to creating aspirational photos as an ambassador, he leads the Ikelite Photo School, conducts equipment testing, contributes content and photography, represents us at dive shows and events, provides one-on-one photo advice to customers, and participates in product research and development. Steve also works as a Guest Experience Manager for the Wakatobi Dive Resort in Indonesia. In his "free" time he busies himself tweaking his very own Backyard Underwater Photo Studio which he's built for testing equipment and techniques. Read more...
Additional Reading
Why You Need Strobes Underwater
Underwater Photo Editing: Trash to Treasure Using Lightroom [VIDEO]
Setting the Tone: Color Grading for Underwater Photography
Top 5 New Features in Adobe Lightroom with Kristina Sherk