


By Steve Miller
This time of year I would normally be busying myself editing a couple thousand images from Wakatobi and another exotic location. This year it would have been the Silfra split in Iceland, where they say the water is so clear it looks like air! My initial editing is usually done in a month, then the next several months involve the more complicated edits, or composites.
These trips were canceled. This year's dive shows were canceled. With no dive related travel over the past few months, I needed a new underwater photography project to work on.
I still have the big orange Tundra case packed for this year's (non-)travel. It's full of wonderful stuff. Lenses, domes, triggers, and the latest camera models. It is necessary to understand and shoot every new camera that comes to market as we design a housing.

Wakatobi tiny scene, 90 feet deep in a coral grotto...? Don't let the shark silhouette (added from another image) fool you. The soft coral in the foreground here is about 4 inches tall, barely 3 feet underwater, and about 2 inches from the dome. It is a tiny section of shallow reef, but careful lighting and perspective control allows you to shoot small areas with even the widest lenses. Photo © 2020 Steve Miller
An obvious solution is to go into my paddlefish-stocked backyard underwater photo studio, but the water is still cold, and the life hasn't awakened yet. That means there isn't great visibility, and it will muck up quickly. It will be much more fun later in the summer. It the meantime it would be nice to make a small one that I can simply fill with a garden hose to shoot little things.
It has been said that all you need to compose a compelling image is a proper mix of shadow and light. So throw in a couple rocks and you have Silfra? (Well, without the sense of space, immersion, etc... but at least you aren't freezing.) Why not build a mini-scene from scratch? The thought of having total control over light, visibility, and perspective of the scene is seductive. So is using all of the gear that would be impractical to travel with, like umbrellas, reflectors, light stands, and even back drops.
How Big?
If we want to create a macro scene, I suppose it could be done in an inch of water in a cup. But I was working with an Olympus Tough TG-6 and FCON-T02 Fisheye Conversion Lens. A circular fisheye lens with a 180 degree angle of view needs a bigger scene.. but how big?

What the camera sees is very different from what you suspect sometimes. Using the iPad to view the small changes you make is a learning experience that will help you when you “shoot from the hip” in open water. Photo © 2020 Steve Miller
Fisheye lenses do odd things to perspective. We use this to our advantage with Close Focus Wide Angle (CFWA or Forced Perspective). Essentially it means that you can make big things look small - and vice versa - depending on how they are placed in relation to the lens. You can fill a 180 degree viewing area with a scene that is just a couple feet across if you don't mind having sky in the frame (and I love having some sky or clouds in my frames!)
I decided to create my scene in a plastic pot for lilies- the biggest I could find. A bunch of rocks are the container and visual elements. I spent more time than I'd like to admit moving rocks around to try and make a scene that channeled my missed Silfra opportunity.
Previewing the Scene
The best way I found to build the scene was to tent the light out with either a back drop or a normal umbrella. This also helps you read your camera settings and previews better. I used the camera's Wifi feature to build the scene in live view. This way you can see what happens when you move something closer to and farther from the lens. If you set an iPad on an easel you can see the scene come together as you add rocks. At this point you may find the perspective shifts that occur to be fascinating (I know I did). At the least it may teach you some new things about how wide lenses work.
Remote Camera Control
Taking an image then lifting the camera out of the water to preview it is tedious. And if your LCD screen is in direct sun, it’s not much help. Contrary to popular belief, it is possible for the camera to stay connected to the iPad over Wifi even when the camera is fully submerged. I've tried this many times in the big pool and the signal always goes away instantly, so this may be because the camera housing remains in contact with the plastic pot when shooting the tiny scene.
Since you are already using the iPad to control the camera, you may as well go completely to a wireless work flow. I used the same app (Olympus Image Share to the TG-6) to load my images into the iPad. From there they can be edited in Photos or the Adobe® Lightroom app. In my scene I've shot over a thousand images, but only bother to take the SD card into Lightroom on my computer for final work on a few of them.

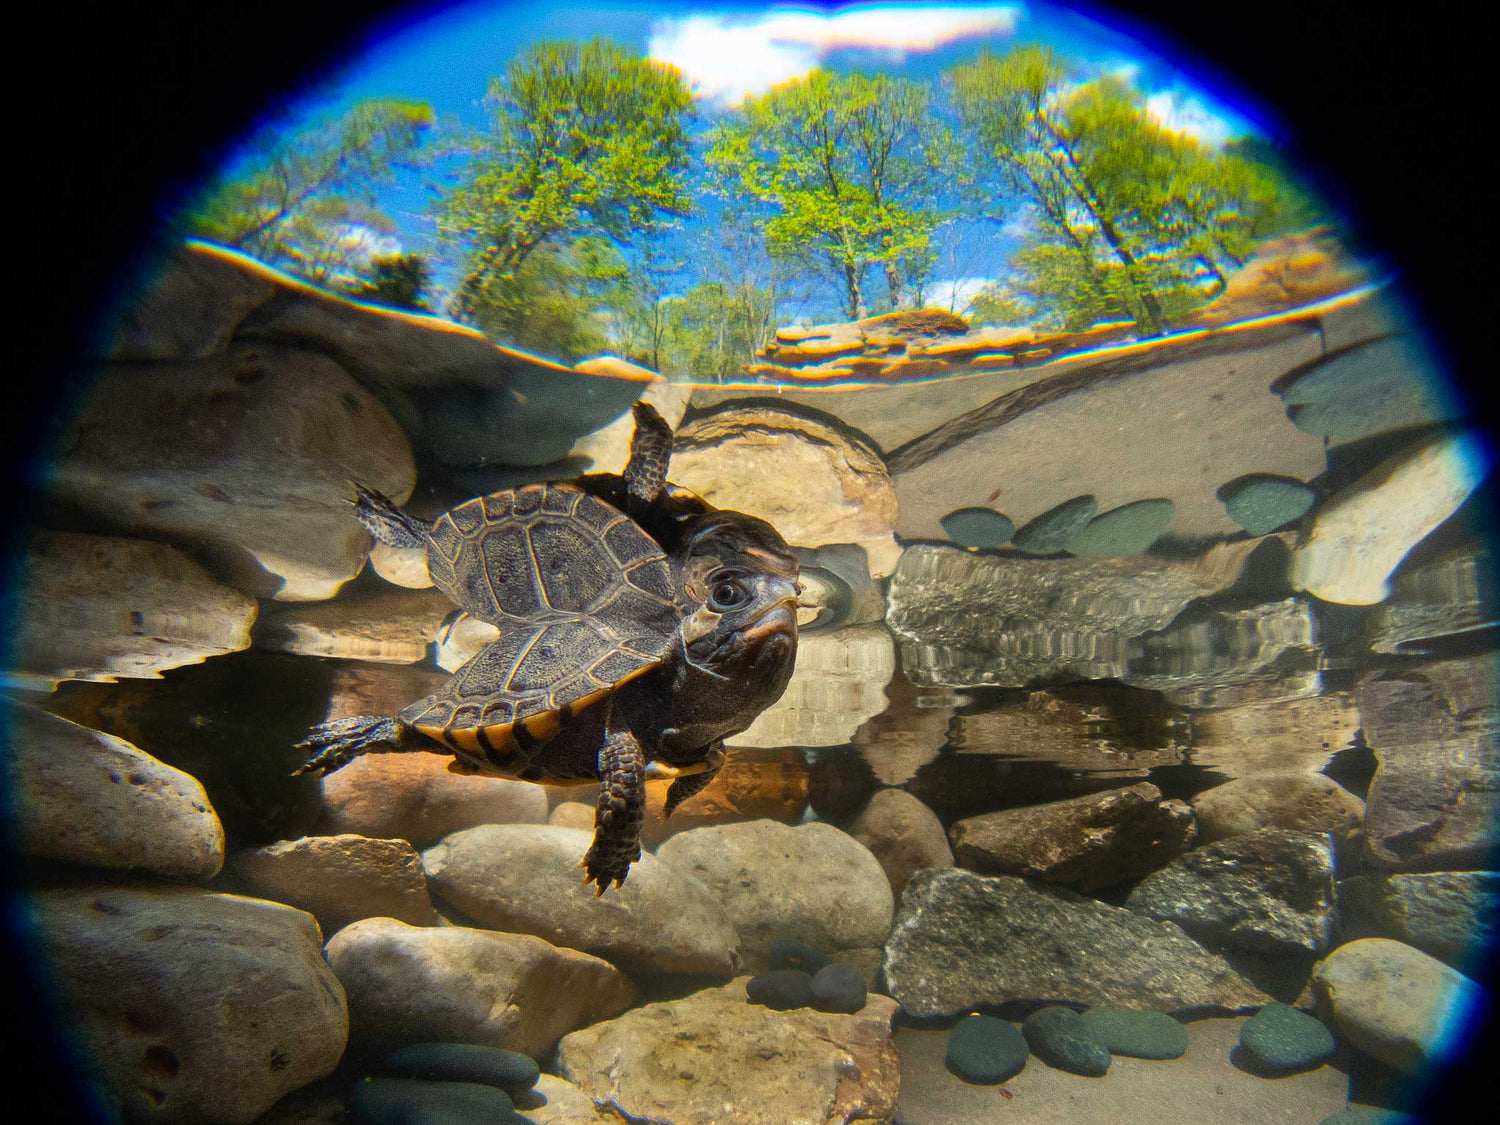
The baby turtle in this scene was uncovered in a pile of sand while doing some work in February. We decided to bring him in for release in the summer as his sand pile was used up. Moving subjects are generally a no-no for wildlife photography, but not here. The trick is to get yourself (or your hand) out of the frame, since the fisheye sees almost everything. Photo © 2020 Steve Miller
Lighting
My first tests were disappointing. The lighting is so... perfect. Too perfect. So uniform that the images are very flat and boring. Without deep shadows, the images lacked depth. Perfect light doesn't make perfect pictures. To the contrary, the things that drive us crazy (like irregular lighting) actually bring a lot of character to an image.
This is where things can get complicated. I've become obsessed with creating light rays, and this is difficult. Effects like light rays can be cheated in Photoshop, but it’s a lot easier to simply enhance effects that you created naturally like light rays on the bottom, or light beams coming from behind an edge.
Anything goes here. The big choice will be natural light or artificial. Using a flash or even a constant-on fill light can give you additional control over lighting direction and intensity. Reflectors aren't used much in diving, but they are very functional here.
You probably already own ball arms for your strobes. If so, then all you need to do is attach a 1-inch (2.5cm) ball wherever you need to hold a camera, light etc. If you are using poles in larger pools, the quick release attachments like a brush from a pool store can be modified simply by attaching an Ikelite ball onto the tool. This allows you to remove the whole system from your pole quickly. If you own studio light stands for surface work, there's a 1-inch ball designed specifically for their attachment style.

Perspective can change dramatically and create interesting new effects with relatively small angular movements. (Left) If we tilt slightly down from above we get the optical mirror as well. (Center) Over-unders (half-in, half-out or split shots) usually have the water line in the center, and are as level as the photographer is able. (Right) Still considered an over-under, when we tilt the camera upward from level, a perfect mirror image results. Photos © 2020 Steve Miller
Playing with Perspective
Watching "live" on an iPad what the small movements of your camera do to the perspective of a tiny scene will be enlightening. I have shot thousands of images underwater "from the hip" - without looking through the viewfinder - and consider myself pretty experienced at knowing what the lens will see even. Still, it is amazing to see it live. Snell's Window will form and and then go away as you change the tilt of the camera. Or an optical mirror image will create itself when the light rays align properly, then go away with a slight tilt.
Refraction from air to water transition, slo-mo raindrops, and puppy treats. Video © 2020 Steve Miller
Special Camera Features
The camera I focused on for this project is the Olympus TG-6, mainly because of it's size and popularity. The remote control App (Olympus Image Share) is free and works well, although some features like Slo-mo are inaccessible. You can work around this by simply disconnecting the Wifi and using the normal camera control, once you have set your scene and designated a place where the camera rests.
If you own an Olympus Tough series camera and have never tried focus stacking with the microscope mode, then you are missing out. Olympus has transformed a very complex Photoshop edit into a simple, single click. The camera will show you each image as the RAW, then an additional JPEG made from the stack of images shot at different focus distances. The difference is huge, so is the "depth of field."
Another feature worth checking out is Live Composite Shooting (in the SCENE menu). This mode allows you to shoot your scene dark, then as slowly as you like you can "paint" in light and watch your scene come together in a live viewing mode. You can spend as much time as you like, because the camera will only record "new light" without overexposing the scene over these long periods.

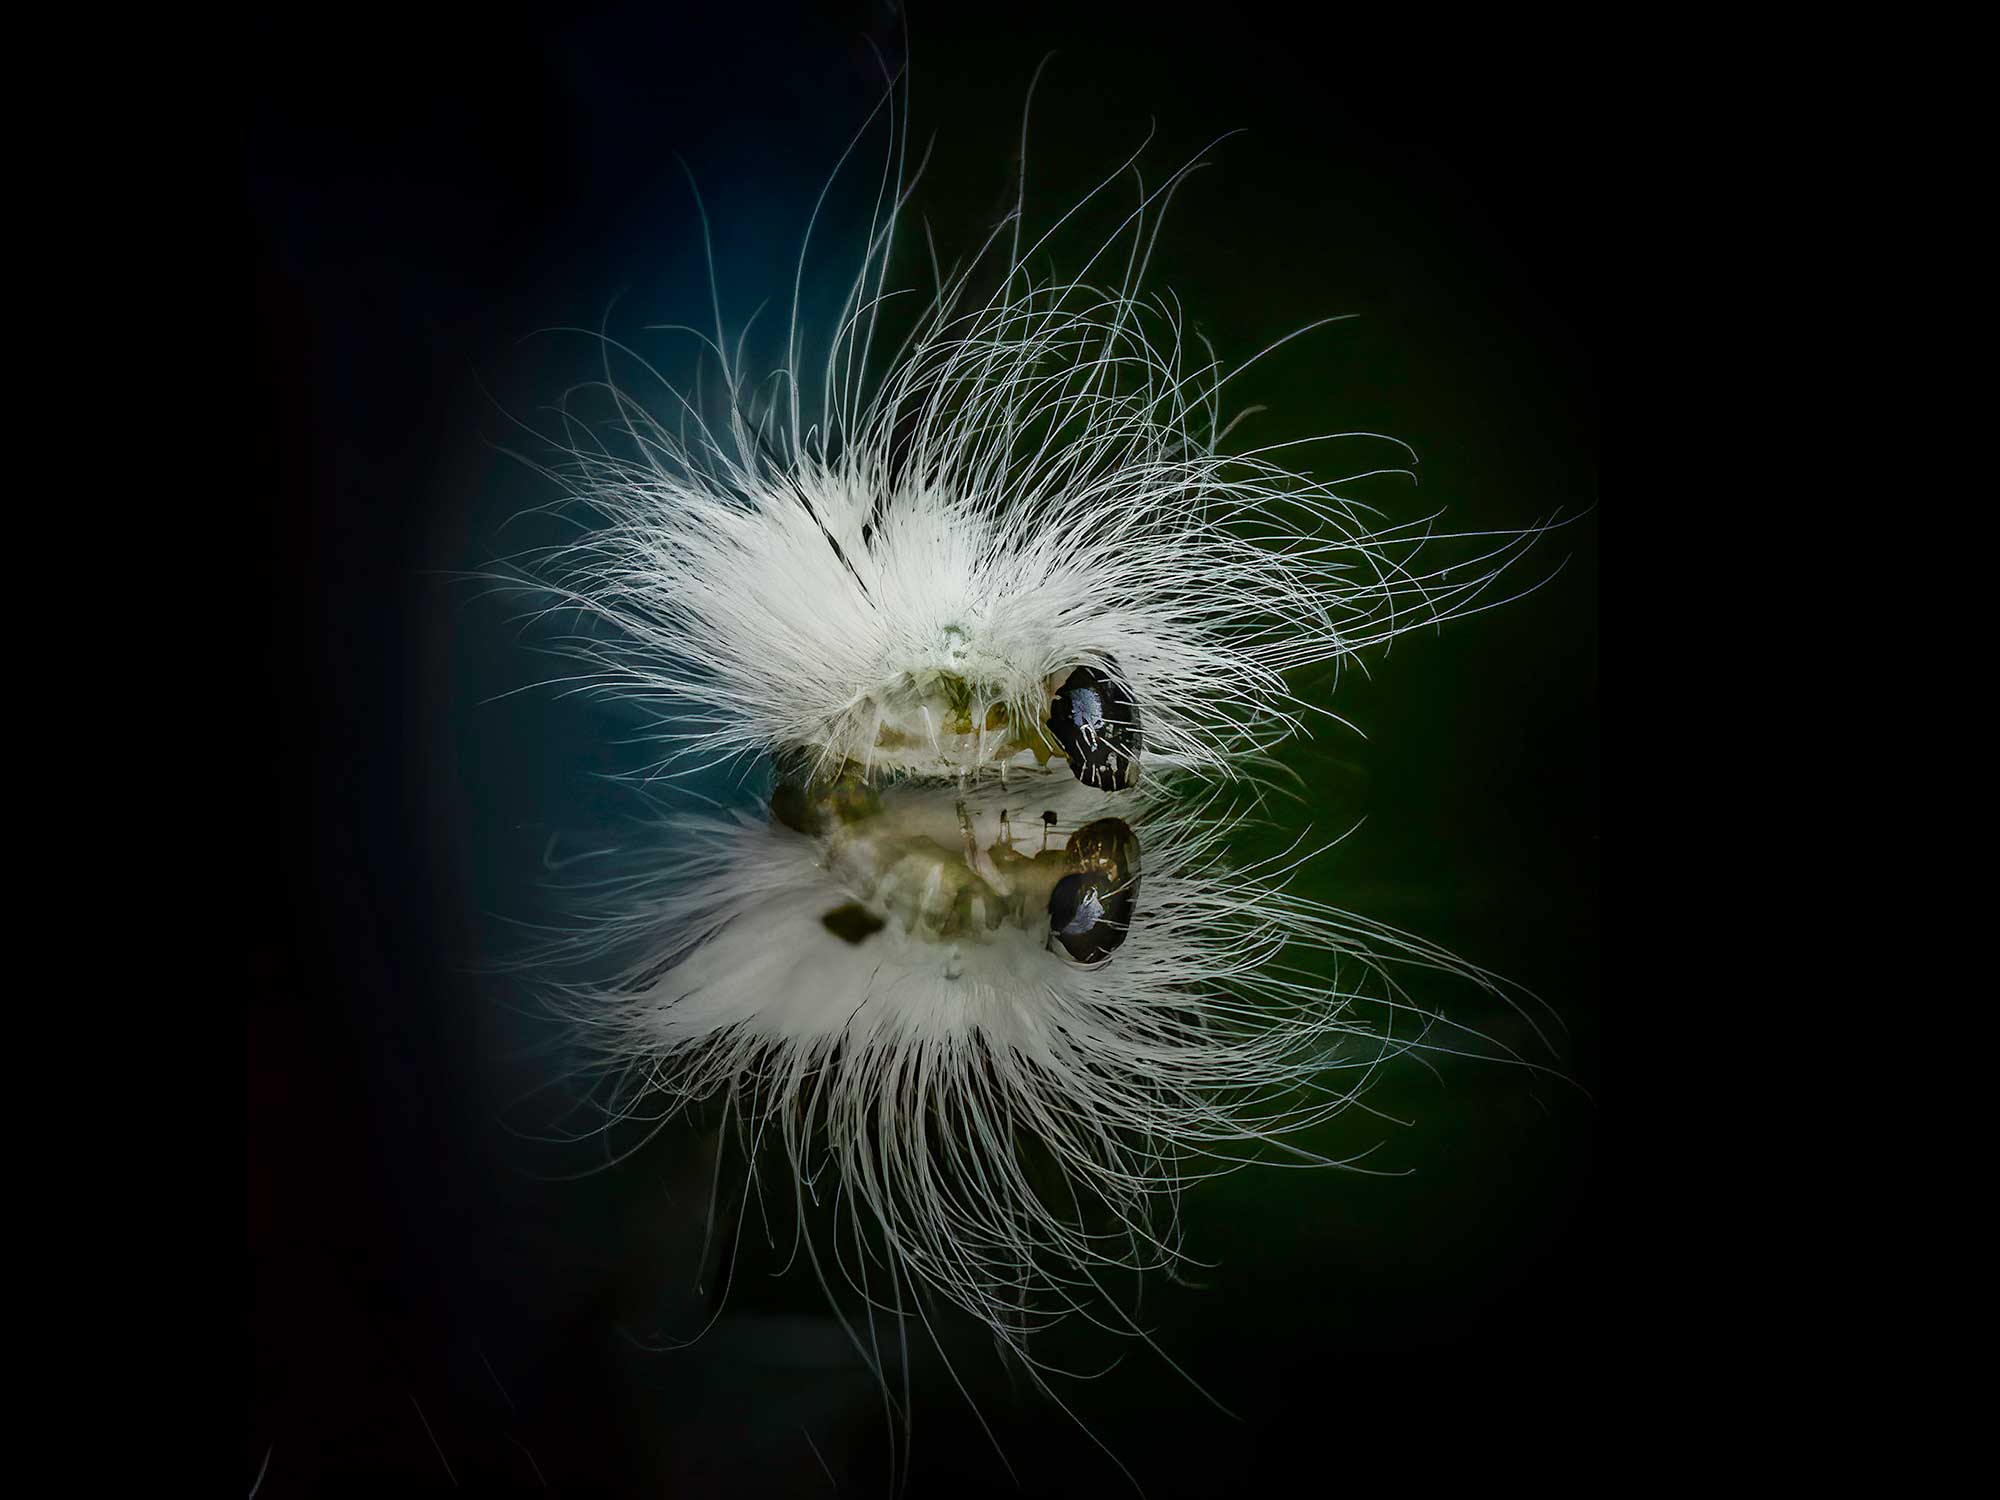
Born in the water, Dragonflies love pools. When they emerge and dry their wings you have about a half hour to shoot them as they hold still or crawl around slowly before their maiden flight. Focus stacking requires your subjects to hold still for at least a second. Photo © 2020 Steve Miller
Conclusion
The biggest thing I got out of my “Tiny Scene” project was the educational value. Experimentation with a fixed scene is a really fast way to learn more about what your equipment is capable of. The results from my tiny scene so far are just OK, but ultimately the possibilities are endless. Perhaps this article will inspire you to make your own tiny scene. If so, please share your results by tagging your photos with #ikelitetinyscene on Instagram or emailing them to us!
 Ambassador Steve Miller has been a passionate teacher of underwater photography since 1980. In addition to creating aspirational photos as an ambassador, he leads the Ikelite Photo School, conducts equipment testing, contributes content and photography, represents us at dive shows and events, provides one-on-one photo advice to customers, and participates in product research and development. Steve also works as a Guest Experience Manager for the Wakatobi Dive Resort in Indonesia. In his "free" time he busies himself tweaking his very own Backyard Underwater Photo Studio which he's built for testing equipment and techniques. Read more...
Additional Reading
How to Shoot Split Shots (Half-In, Half-Out of the Water)
Building the Next Generation Backyard Underwater Photo Studio
Snell's Window: A Wide Angle Photography Effect
Wide Angle Fisheye to Macro on the Same Dive with the Olympus Tough TG-6